On Broken ACPI DSDTs
A couple months ago, I replaced the AMD Sempron 3100+ (1.8GHz) in my HTPC with a newer AMD Athlon64 3200+ (2.2GHz). It'd been having some trouble multitasking: specifically recording and watching HD content at the same time could often cause stuttering, especially if the commercial flagger was running at the same time. It also had issues with some higher-bitrate 1080p content. So, I got the replacement CPU.
I swapped CPUs (scaring myself to death when I realised I'd almost broken the socket when the CPU got stuck to the heatsink, and I yanked the CPU out of the socket without lifting the ZIF lever), and noticed an odd error on boot:
powernow-k8: Found 1 AMD Athlon(tm) 64 Processor 3200+ processors (1 cpu cores) (version 2.00.00)
ACPI Exception (processor_perflib-0234): AE_NOT_FOUND, Evaluating _PSS [20070126]
powernow-k8: BIOS error - no PSB or ACPI _PSS objects
ACPI Exception (processor_perflib-0234): AE_NOT_FOUND, Evaluating _PSS [20070126]
Basically, that means the powernow-k8 driver was reporting that it wasn't provided a _PSS or PSB block in the ACPI DSDT, so it didn't know about any CPU P-states, and thus CPU frequency scaling wouldn't work. Since I do sometimes leave the machine on idle, this was a bit annoying, since it'd be burning some power that it wouldn't otherwise need to burn.
So, I googled a bit (oh, sorry, "performed some Google searches"), but didn't find anything particularly promising. I checked the BIOS settings; yes, the "AMD Cool'n'Quiet" feature is enabled. I tried disabling it, rebooting, and then re-enabling, and rebooting, but no luck.
Fast-forward a couple months. A few days ago, I ran across something that reminded me of the problem. Some stuff about many motherboard manufacturers/BIOS writers providing crappy DSDTs in their ACPI implementation (the DSDT is what tells an ACPI-compliant OS what ACPI features are supported, and how to used them). So, I found a nice resource that told me how to fetch the DSDT from my BIOS, and decompile it for inspection.
According to the decompiled source, the DSDT was compiled with Microsoft's compiler, which, I understand, is kinda crappy in that it lets a lot of errors past. When I tried to recompile my DSDT with Intel's compiler, it threw 6 errors and around 20 warnings. I poked around at the errors, and, with some helpful pointers, I managed to fix the errors, or just comment out the portions causing fatal errors that I was pretty sure don't do anything useful anyway.
The errors, however, didn't seem to have anything to do with the missing P-state descriptions, though I did notice that the DSDT source was missing either a _PSS section or PSB section, as the kernel complained about.
So I googled some more, and came across this guy, who seemed to have a similar problem, but with his Athlon64 X2. He basically said he noticed that his processor description sections were empty, and found a DSDT on the Linux ACPI website for a similar motherboard that happened to have the proper _PSS entries, and copied them over, tweaking them a bit. Fortunately he also posted the sections he added.
Now, the X2 isn't really the same chip as mine, but it was a place to start. I googled a bit more, and found another guy with a similar problem, and this guy even has the exact same CPU (down to the generation) as I do! Unfortunately, though his post seems to indicate he resolved the problem, he didn't post a how-to, but did mention he got some information from some documentation from AMD.
So, off to AMD's website. Cool, they provide quite a bit of technical documentation for their CPUs. I grabbed the BIOS and Kernel Developer's guide to my CPU, and started looking for stuff about "_PSS". Fortunately, it wasn't hard to find (the doc is over 450 pages long). The structures and values I found from the X2 guy's website are documented, and it gave some good defaults for some of the timing-related pieces.
Unfortunately, AMD's specs don't cover my particular spin of the CPU, so I couldn't figure out what P-states my CPU supports, or what voltages they should run at, or what the power dissipation is for each state.
So, I had to fudge some values and make some stuff up. Wikipedia says my CPU runs at 59 W. Fair enough. But that's for the default 2.2GHz frequency and 1.4V voltage. But what about lower frequencies? I decided to arbitrarily pick 1.6GHz at 1.3V and 800MHz at 1.2V for my other 2 P-states (presumably I could pick more, at 200MHz increments, but I wanted to keep it simple). Running a CPU at a lower lower voltage when underclocking is generally a reasonable thing to do; though dropping the voltage too low is probably a bad idea. But what about power dissipation? According to the specs, only the max/default P-state has to have its power dissipation value specified exactly. All slower P-states can be estimated. Good news. I just simply took the 59 W value and scaled it down based on both the frequency ratio and voltage ratio. Is that exact? No, certainly not. But it's probably not totally off the mark.
One value eluded me. One of the values is a control register that needs to get set. The control register has 7 different sub-values. AMD's documentation gives good defaults for six of them. The last one, PLL_LOCK_TIME, seems pretty important: it's the time it takes for the processor PLLs to re-lock after a state change. A PLL is essentially a clock generator. You have a phase detector and some kind of oscillator (where you can change the freqency), and then a feedback path that has some kind of divider circuit. Anyhow, I lucked out on this one: the X2 guy provided values for these, and since his values for all the other six seemed to match mine, I crossed my fingers and hoped his PLL_LOCK_TIME is the same as mine.
So, whew. I added the missing PSS section to my DSDT, with the three P-states, and recompiled it, fortunately without errors. (I decided not to bother with the existing warnings because I'm lazy.) Now, how do we use it? According to the original Gentoo forum page I was looking at, you can either patch the kernel to use a file that you have to put in the kernel source tree in a particular location, or you can patch the kernel to read the DSDT out of an initrd. Boo, I don't wanna patch my kernel. So I googled a littler more, and it appears that recent kernels have a better option: you can enable a kernel config parameter, and it'll let you specify a path to a header file (helpfully generated by the DSDT compiler) to use. So, 'make menuconfig', and I dig around for the option. Not there. Oh, I need to disable the "Select only drivers that don't need compile-time external firmware" option. Ok... still not there. I search for config options with "DSDT" in them, and find that the one I want requires that CONFIGX86_VOYAGER isn't set (which it isn't), CONFIG_ACPI is set (which it is), and CONFIG_STANDALONE isn't set (which it isn't, now that I disabled it). But still, no option. So, let's try another tack. I quit menuconfig, and open .config in a text editor. I remove the one DSDT-related line, save it, and run 'make oldconfig'. Now, it prompts me for the DSDT-override option, and, when I select it, I get prompted for a file location. Nice. And lame. But mostly nice. So, I recompile (first intentionally negelcting to copy the header file to the location I specified, just to make sure it would error out, confirming that the option was enabled), install the kernel image, and reboot. The box comes up, I ssh in, and check dmesg:
powernow-k8: Found 1 AMD Athlon(tm) 64 Processor 3200+ processors (1 cpu cores) (version 2.00.00)
powernow-k8:    0 : fid 0xe (2200 MHz), vid 0x6
powernow-k8:    1 : fid 0x8 (1600 MHz), vid 0xa
powernow-k8:    2 : fid 0x0 (800 MHz), vid 0xe
Oh, yes. Yes, that's nice. I cat /proc/cpuinfo, and see that my CPU is now running at 800MHz (I have the machine set up to use the 'ondemand' cpufreq governor, which sets the frequency to the lowest needed given the system load). I dig around in /sys/devices/system/cpu/cpu0/cpufreq/, setting different governors and speed values, and checking that /proc/cpuinfo reports the new speed. Success!
Presumably, I could add more P-states, but I think 1600MHz and 800MHz will do. For those of you with similar problems, my motherboard is a DFI K8M800-MLVF. Feel free to use my hacked DSDT if you have the same motherboard, or as a reference point if you have another Socket 754 system or similar CPU. Of course, I offer this with no warranty and accept no liability, and if your system explodes, it's your responsibility and all that.
See also: my AMD _PSS notes, and my AMD _PSS value table.
Backups on Xubuntu with SBackup
The earth is orbited by many satellites, and every year, many more are sent up into space. Considering the amount of satellites, there is an enormous risk that one of those artificials moons suddenly decides to take a stroll and crashes into your home. I think you’ll agree with me that this would be disastrous - all your precious data would be lost! Your holiday pictures, important documents for school/work and your music collection - all gone!
Of course, you have to protect yourself against catastrophic situations like the one described above (and against hard drive failures). If you’re anything like me, you have no backup solution set up, and though you want to set it up, you keep postponing really taking that step. Well, now is the time. In order to write this guide, I set it up for myself, so now it’s your turn while reading this guide. And let me tell you, once you free up those minutes to set it up, you’ll be glad you did. Even if you’re never going to need it, it feels a lot better knowing that you’re prepared for eventual bad luck.
You need a place to store your backups though. If you create a backup on the same drive as the original files, a hard drive failure will affect that backup just as much as the original files. For out method, the destination can either be another hard drive or a remote directory (through SSH or FTP). If you don’t know what any of these mean, then you probably do not have access to it. Unfortunately, this means that you will not be able to create a backup. If you do possess one of these, read on ![]() .
.
The destination I’ll be using is an internal hard drive that used to hold a secondary and lesser-known operating system. Its capacity is a mere 20 GB, so I’ll only be backing up my most important files. Of course, if you happen to have an external 160GB hard drive laying around, be sure to use it to the fullest.
Introducing… SBackup!
A quick search using Applications->System->Add/Remove... (with “All available applications” enabled in the top right-hand corner) for backup turns up a few backup solutions. The application we will be using, which also happens to be the most popular one, is Simple Backup, or SBackup. SBackup is a complete solution, able to automatically create backups at set intervals, keeping the backup size as low as possible. Listed are Simple Backup Config and Simple Backup Restore, which allow you to backup and restore your backup respectively.

Selecting one will also select the other because, obviously, we need to create backups in order to restore them.
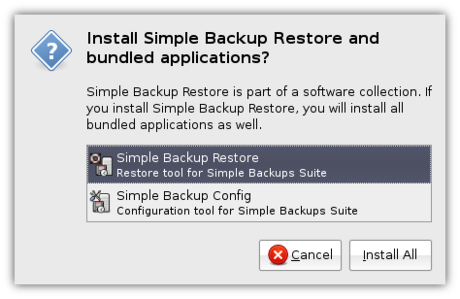
With both selected, click Apply Changes and finish the installation as usual.
Once the installation has finished, you can find SBackup’s configuration utility under Applications->System->Simple Backup Config.
Setting it all up
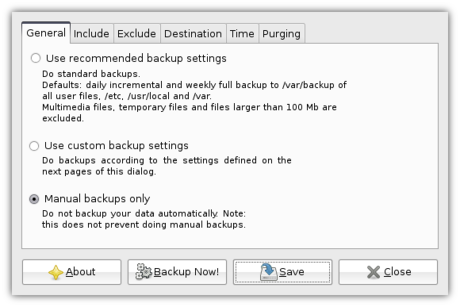
By default, SBackup is set up to only perform backups when you tell it to. However, for maximum security, we want it to automatically create a new backup every so often, and now and then delete old backups in order to save space. To make sure the backups are created exactly the way you want it, select Use custom backup settings.
The first thing to do is selecting which files you want to be included in the backup. This can be done under the Include tab on top.
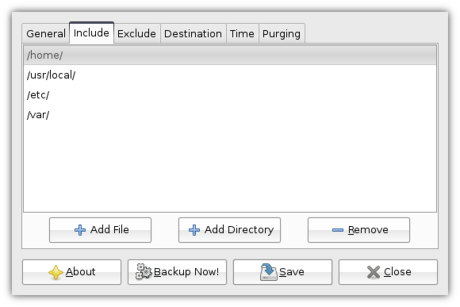
SBackup comes with a few useful defaults, however, considering the size of my backup drive, I decided to only backup the /home/ directory, which contains the documents and settings of every user on the system. Do include the defaults if you have enough room, though.
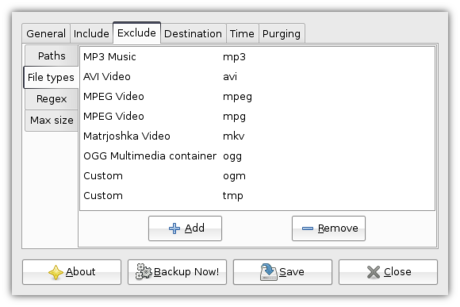
Next is deciding which files you do not want to be included in the backup, which can be done under the Exclude tab. You can use the preferences in this tab to exclude any files which you do not regard of enough value to justify the amount of space they’d consume in the backup.
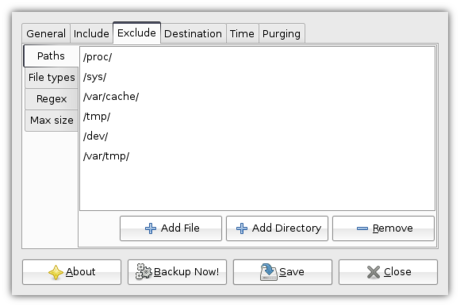
The Exclude tab, in turn, contains four other tabs on the left-hand side.
The first one is the Paths tab, which allows you to exclude complete directories. I left it at the defaults since I had no specific directories I wanted to exclude, and I also felt no need to include the directories listed as excluded by default.
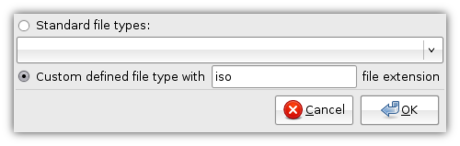
Moving on to the File types tab, though, there were certain files I could not afford to backup. A lot of multimedia files were already excluded, which was fine to me - I cannot afford to back up my (measly little) music collection. However, I often help testing new versions of Xubuntu. This involves downloading complete CD “images” (files that can be put on a CD) which can be up to 700 MB in size. The names of these images always end in .iso, and since there is no need for me to keep them that long, I clicked Add and opted to exclude files with the iso extension.
The Regex tab is not that interesting for this guide, since those who know what it does, are able to figure it out by themselves.
The Max size tab is very useful though, because it allows you to set a maximum size for files to be backed up, which comes in very handy in preventing your backup from growing too big.
We then move on to the Destination tab on top. This tab allows you to, as its name implies, set the destination for your backup. You can set up a remote directory at the bottom - I’ll be setting a custom local backup directory.
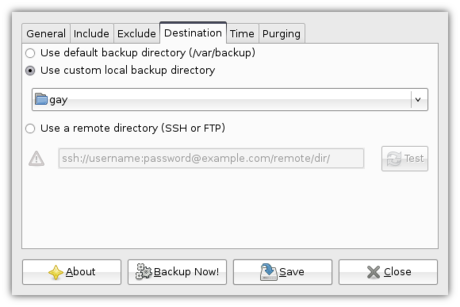
I located my external hard drive in the /media/ folder, by the name hda1. It is also listed in my left pane in Thunar (the file browser) as 20G Volume. In there, I created a new folder (/media/hda1/gay/, with gay being the name I gave my computer during installation, but feel free to use whatever you like) to hold my backups. Then I selected Other… in the drop-down menu and selected that folder.
Next up was configuring when the backup is to be ran in the Time tab.
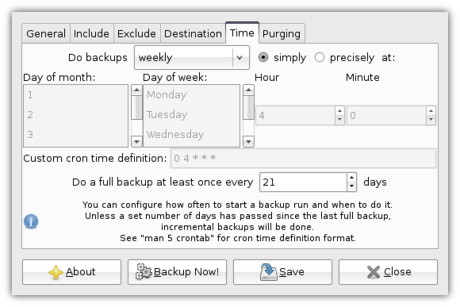
Since I do not have that much space I opted for weekly backups, but of course, the best way to go would be daily. Since I do not leave my computer on 24/7 I cannot set it to create a backup in the middle of the night, so I opted for “simply”, which supposedly means “as soon as the computer is running, with the previous backup being made at least one week ago”.
The last tab, Purging, allows you to configure how long you want to keep old backups.
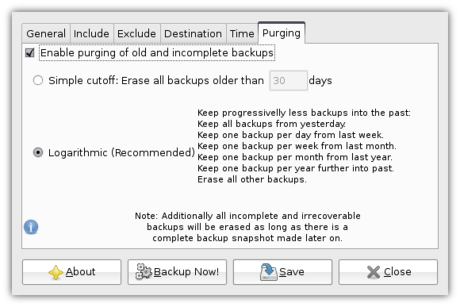
Mostly, you’ll want to select “Logarithmic”, being the most efficient and recommended method, but if you want to select an exact number of days to keep old backups, that’s possible to.
After finishing the configuration, click “Save” to, well, save your configuration.
Let’s back things up
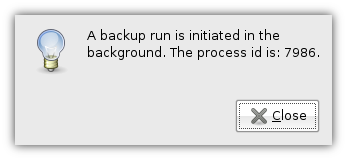
Of course, I immediately wanted to make my first backup. For that, SBackup comes with the extremely handy “Backup Now!” button ![]()
Clicking that popped up a window, saying: A backup run is initiated in the background. The process ID is: 7986.
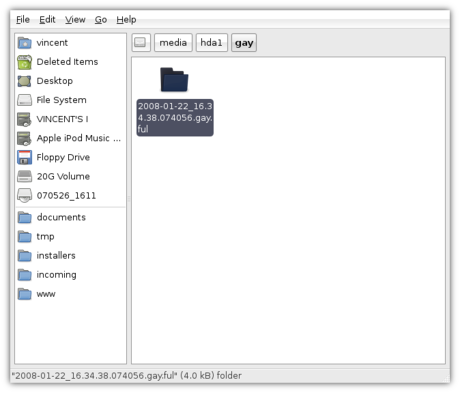
Well, that’s it really - now you can close Simple Backup Config. The backup is being created, and the next one will be created after the period you selected ends. Opening the folder you selected as the destination (/media/hda1/gay/ in my case) will show you that a new directory has been created which will contain the backup.
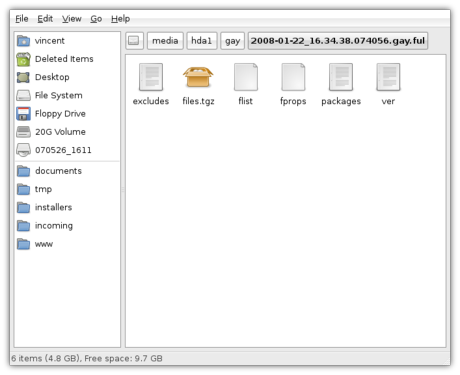
If you take a look at a later time (once the backup has been completed), you will see that that directory has been filled with files containing information about the backup, and files.tgz which contains the backed-up files.
Restoring a backup
Restoring the backup is very easy, too. Open up Applications->System->Simple Backup Restore, from where you can select the location of your backups.
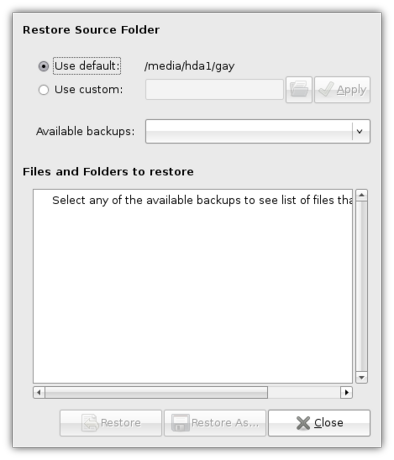
A drop-down menu “Available backups” provides you a list of all available backups. Selecting one of them will present you with a list of files included in that backup, clicking “Restore” will restore those files in their original location, “Restore As…” allows you to select a different location.
Conclusion
It was about time you created yourself a backup, and tell me: doesn’t it feel wonderful? Simple Backup is an excellent tool that, despite not being as good-looking as Apple’s Time Machine, definitely provides a complete solution for backing up your documents.
And by the way, with this being my first post of 2008, let me wish you all the best for the coming year. 2007 was an magnificent year for this blog, having survived into 2008 since its conception in 2007. There’s no complaining about the number of visitors, too: at the time of writing, with just 24 posts (this being the 25th), I’ve received a total of 116 798 views, with about 500 to 600 views a day recently. Furthermore, I believe it’s also been useful to a few people, which was the reason for starting this blog in the first place.
On the personal level, it also was a fantastic year. My mother’s ex, who was a massive burden to me, finally left (he lived here since I was about thirteen years old), enabling me to develop tremendously as a person, which I expect to continue in 2008. My writing style has also improved - another trend which I hope will continue in 2008.
All in all, let’s make 2008 another awesome year, and of course, if you got any further suggestions, be sure to make it known ![]() .
.


Air
I'm a bit disappointed in the newly-announced MacBook Air. I want one, but... I don't.
The good:
Super-thin form factor: 0.16" to 0.76".
MacBook Pro-style aluminum case.
Small size: 13.3" widescreen display.
802.11n wireless (dual-band 2.4/5 GHz).
Intel GMA graphics (very well supported on Linux, even if it's not as 'powerful' as nvidia/ATI).
Backlit keyboard.
LED-backlit display.
Multi-touch trackpad (though I have no idea how well-supported or useful it'll be on Linux).
Unfortunately, we have quite a bit of the bad:
No built-in ethernet (USB dongle sold separately, but that rules out gigabit).
No built-in optical drive (I expected this; I don't mind).
Only one USB port. So if I get the USB ethernet dongle and/or the external USB optical drive, I have to choose which one I want to use. And if I'm somewhere where there's no wireless, and I have to use a USB flash drive, I have to disconnect the network. Lame.
Non-user-replaceable battery. (I imagine it's possible, though somewhat difficult, like replacing the hard drive in my PowerBook was.) This is somewhat annoying for me since I tend to have the machine on 24/7, and as such I'm a bit harsh on the battery (I leave it plugged in while fully charged for long periods of time).
RAM is not upgradeable (soldered to motherboard). Comes with 2GB standard, so probably not too much of a problem.
Relatively slow CPU given today's state-of-the art. (Granted, 1.8GHz dual-core should be plenty for me.)
The IBM X-series used to use the 1.8" 4600 RPM hard drives, but switched back to 2.5" drives because of large performance problems with the 1.8" drives.
No dedicated graphics memory (144MB shared with system RAM).
Only a single speaker (mono sound). Though, do you really notice stereo separation with a pair of crappy speakers about a foot apart?
A concern: will the laptop hold up? It's very thin. Aluminum is definitely bendable (as my 12" PowerBook which no longer sits flat will confirm).
MacBook-style keyboard. I'm not a huge fan of the keyboard on the MacBook I have at work. I far prefer the keyboard on my PowerBook (and on the MacBook Pro).
I'm not considering buying one now; not only should I not be spending the money now, but I wouldn't dare buy first-gen Apple hardware. So fortunately there will be time to see if my concerns about the laptop's durability are warranted, ditto for my concerns about hard drive performance. And it's possible there might be a refresh in 6-8 months that includes better graphics, more RAM, a faster CPU, or even (however unlikely) an extra USB port or an ethernet jack.
I guess the issue is that I was really hoping for a 12" (or 13.3", though I'd prefer 12") MacBook Pro, essentially an Intel-based replacement for the 12" G4 PowerBook. I knew that wasn't what Apple was going to announce, but I was hoping it wouldn't be too far off the mark.
I'm still undecided, but I'm going to give myself at least 6 months to think about it, and probably more. Likely I wouldn't buy one until the fall. There's also the hope that there will be a major MacBook Pro refresh before then that improves the MBP situation a bit. Given the introduction of the MBA, I seriously doubt they'd start selling a 13.3" MBP, but it's possible they might somehow make the 15" MBP more attractive to me. Unfortunately, I just don't really like the MacBook's aesthetics; I wouldn't really consider buying a 13.3" MacBook for myself. We'll see what happens, I suppose.
It´s a girl!
I´m very proud to present to you my daughter:
Her name is Leonie and she was born on Sunday, January 6, 21:06 CET. She is undoubtedly the most beautiful baby in the world. You´re thinking all fathers say that, but I´m sure this time it is true ;-)
migration and midori

Well, I tried to migrate to group-xfce-dist on fl:2 but I had some problems with python-sqlite and conary will remove a couple of packages, find details here.
Thanks to ken, who has built Webkit for 'GNOME Developers Kit', I was able to build and run midori on Foresight Linux (using my "do thinks that can break anything here"-qemu/win2k box).
Roadmap
Recently pcuttler gave me proper rights to add Releases to Xfce Edition on jira. So Xfce Edition has some blocking tasks that need to be done before getting an alpha release.Check them out at foresights issuetracker