Ubuntu from your flash drive – easier than ever before
As you have probably noticed, new versions have arrived of Ubuntu, Xubuntu and other derivatives. One of the most exciting new features has received far less publicity than it deserves – the ability to “install” it onto your USB flash drive with just a few clicks.
The advantages are obvious: just plug your flash drive into a computer and run your favourite operating system. What’s more, everything you do — installing applications, saving documents, editing preferences — will be saved to your flash drive and will be available to you every time you run it!
The best news is that it’s astoundingly easy: all it takes is a few clicks.
Of course, there are a few requirements. First, you can only run it on computers that support booting from a USB flash drive – this is the case for most computers nowadays. Secondly, you must have a CD or a CD image. The latter can be downloaded free of charge – I, obviously, downloaded Xubuntu. Third, you’ll need to install usb-creator, the new application that is readily available in version 8.10 but which you can also download and install on version 8.04 (with Windows and Qt versions planned). And, last but not least, you’ll obviously need to have a USB flash drive.
Once installed, you can find it in your menu as Create a USB startup disk (on Xubuntu it is located under Applications->System, in Ubuntu this would be System->Administration, IIRC).

The first thing you’ll need to do is to insert the flash drive you’re planning to use. Usb-creator will then detect the drive – if multiple flash drives are inserted, you can pick from a list which one you want to use, and if the drive isn’t formatted yet usb-creator will give you the option to do so (note that this will destroy all files on it!).
The next step is inserting the appropriate CD into your CD drive, or loading the CD image you downloaded before by clicking Other….

Finally, you’ll need to configure whether you want all your documents, settings and applications to be discarded on shutdown (i.e. act as a regular LiveCD) or if you want to save them to your flash drive (this is called persistency, or persistent mode). If you pick the latter, you’ll also be able to select how much space you want to reserve for this.
Do note that usb-creator will not overwrite existing files on the drive – thus, if you want to use your entire drive, you’ll first have to delete all existing files.
Now, with everything configured, click Make Startup Disk, and sit back and relax while usb-creator prepares your flash drive.
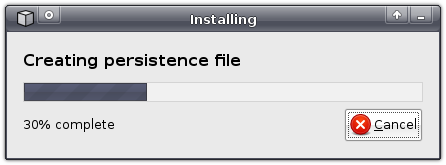
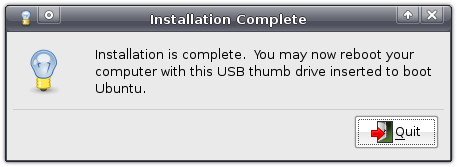
You can do something entirely different now, like reading the rest of this blog, viewing all my screenshots of usb-creator, whatever you like. Once usb-creator is finished, it will notify you that it’s done. All that’s left now is to boot your computer from your flash drive and have fun ![]()
Troubleshooting
If persistency does not work, you might need to edit the file text.cfg in the syslinux folder on your flash drive. Just replace the line default livewith the following lines, adding a new Start Xubuntu option to the boot screen the next time you boot. Note that you might want to replace occurences of “Xubuntu” with the name of the distro you’re using. This has been tested with Xubuntu 8.10;
default persistent

label persistent

  menu label ^Start Xubuntu

  kernel /casper/vmlinuz

  append  file=/cdrom/preseed/xubuntu.seed boot=casper initrd=/casper/initrd.gz quiet splash persistent
--


Getting help with Xubuntu
Even though I’d very much like to say the opposite, most people will probably need help with Xubuntu at some point. Luckily, it is quite easy to find help – you just need to know where to look.
First of all, you need to determine what kind of problem you are having.
Getting started
If you are new to Xubuntu, you will want to read the excellent Xubuntu documentation, that is also shipped with Xubuntu (in version 8.04 it is located under /usr/share/xubuntu-docs/index.html). It should be your first stop when trying to figure out how to connect to the internet, how to install applications, and similar basic tasks. All this thanks to the huge, voluntary efforts of the Xubuntu Documentation Team (you can also help out with the Xubuntu documentation yourself!).
Of course, if you want to perform slightly more advanced tasks, such as setting up periodical backups on Xubuntu, the internet is your friend. There are a lot of great resources on the internet that can help you with anything from installing Xubuntu on the Eee PC to browsing Windows network shares with Thunar. However, be sure to double-check which version of Xubuntu the guide is written for. For example, the post on browsing Windows network shares I just linked to is, at the time of writing, a little outdated and contains unnecessary steps.
It is also safest to look for articles written specifically targeting Xubuntu – tutorials aiming at Ubuntu users will often work as well, articles targeting just “Linux” are less likely to result in success.
When you can’t find the answer
If you’ve spent time roaming the dark alleys of the internet, spit through every last bit of Xubuntu’s official documentation, but still don’t have an answer, there are a number of support options.
One requirement for all these options is that you specify as much information as possible. This includes, but needn’t be limited to, the fact that you’re running/wanting to run Xubuntu, which version of Xubuntu you’re running, what you’re problem is, what the expected result is, and perhaps how proficient you are with Xubuntu. This allows other people to help you in the best possible way.
The xubuntu-users mailinglist is, well, a mailinglist for Xubuntu users. All messages sent to a certain email address (xubuntu-users@lists.ubuntu.com in the case of xubuntu-users) will be delivered to everybody who has subscribed to that mailinglist. Thus, if you need help with Xubuntu, you can subscribe to that mailinglist, send an email to that address explaining your problem, and perhaps the next time you check your email, the answer is waiting for you.
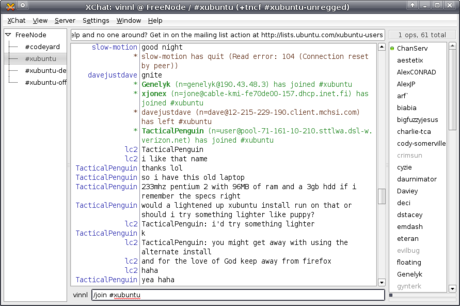
You might not have the patience to wait for people to respond, however. If that is the case, fear no more, as IRC comes to the rescue! IRC is a way of being able to communicate in real time with other people – in other words, a chatbox. First you need an application to talk IRC – Xchat, DarkIRC, whatever, it shouldn’t really matter. Using your IRC client, you need to connect to a network – FreeNode (on irc.freenode.net) in this case. Once you’re connected to the network, you need to join the appropriate chatroom (how old-school is that?) – the Xubuntu support room (or channel in IRC lingo) is #xubuntu. You can join by typing /join #xubuntu.
Once you’re in – ask away! Be sure to be polite, not to spam the channel, and realize that, if nobody answers, probably nobody knows. Don’t ask the same question over and over again.
It is no secret, however, that the Xubuntu community is not quite the size of the Ubuntu community. Luckily, many people in the Ubuntu community can also help you with your Xubuntu problems if nobody in the Xubuntu community can. The place to get help from the Ubuntu community is the Ubuntu forums. With a very large amount of active members, your question is very likely to find an answer here.
Another place to get help is at Launchpad answers, which is part of Launchpad, a project management website where Ubuntu is managed. Here, you’ll be more likely to find developers, who are most likely to be able to help you.
When there is no answer
Even with this vast range of support options, some problems are just errors in the software – so called bugs. These can be reported at bugs.ubuntu.com, where a developer can look at it and, if you’re lucky, provide a fix for you and other users to enjoy.
Conclusion
Of course, there will still be times when no answer can be found. However, after having read this article, you’ll hopefully be able to better find help yourself. And of course, if you cannot find help, feel free to ask me – I may not be able to provide an answer, but I might be able to give you some pointers.


Sharing the love with BitTorrent
Xubuntu 8.04 is out! This release, along with those of Ubuntu, Kubuntu and whatnot, means that the Ubuntu servers are going to have a hard time with everybody and their stork downloading these new releases at the same time. Being the good open source citizen that you are, you are probably more than willing to take some of the load. Look no further, as BitTorrent is here to save the day!
In short, BitTorrent allows you to download files from other people, meanwhile sharing the parts you have already downloaded with other people who, just like you, are eager to try out the latest and greatest the open source community has to offer.
To download files using BitTorrent, you need a BitTorrent client. Since Xubuntu 8.04 includes Transmission, that is what we will be using. If you’re not using 8.04, make sure to install it.
The first thing we need, is a torrent file, a file with a name ending in .torrent that contains all the information Transmission needs to download the appropriate files. The Xubuntu 8.04 torrent can be downloaded from Ubuntu’s torrent website, where you can select the graphical Desktop CD (which is what most people want) or the text-based Alternate Install CD. We want the torrent files for Intel x86 architectures (most computers) or for AMD64 architectures (you’d probably know if you need this, using 64 Bit). A torrent file is not that big, so it should not take too long to download and does not place much of a burden on the servers.
After having downloaded the file to wherever you like, open up Transmission from Applications->Network->Transmission.
When newly installed, Transmission will download all files into the same directory as the torrent file. Instead of adapting to software (by remembering where it downloads files to), I make software adapt to me, so when I open a torrent file with Transmission, I want it to ask me where I want the files to be downloaded to.
Luckily, this is easy: simply open File->Preferences. While the preferences window is filled with cryptic terminology, the option I’m looking for is quickly found: all I need to do, is check the checkbox in front of Always prompt for download directory.
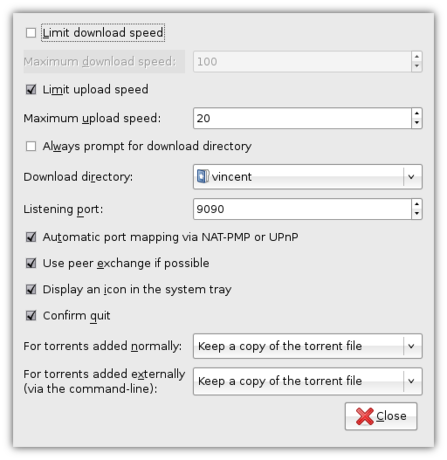
You can configure a whole host of additional options in the prefences window, such as the maximum download and upload speed. Be aware, though, that if you lower the maximum upload speed (i.e. the speed with which you are sharing the files with other people), the download speed will also decrease, so as to encourage everybody to share as much as they can.
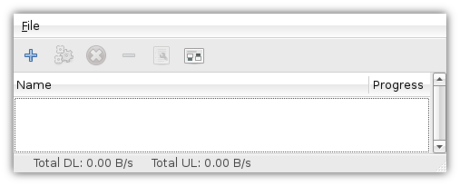
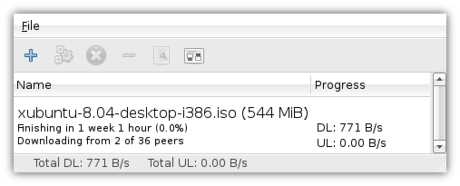
When you’re done configuring Transmission, click Close in the Prefences window – it’s time to start downloading! Click File->Add and locate the torrent file you downloaded earlier. After you’ve opened the file and selected a target folder, Transmission will start downloading. While it will still be a long wait (the Xubuntu ISO image is a whopping 544 MB), if a lot of people are sharing the love then it’ll be faster than a direct download, and you’re helping other users at the same time.
Once you’re done downloading, you’ll want to verify that the file you downloaded is the correct one. After you’ve done that, the big moment is there: you can install Xubuntu!
Don’t close Transmission though! If you leave the window open after your download has completed, Transmission will continue sharing the downloaded file with other users – this is called seeding and is a good habit if you want to be a Nice Guy. You can also resume seeding after you’ve closed a torrent – simply re-open the torrent file and select the same download location.
All in all, while often associated with illegal downloading, there are plently of legit situations in which BitTorrent saves the day. Now spread the love!


