Backups on Xubuntu with SBackup
The earth is orbited by many satellites, and every year, many more are sent up into space. Considering the amount of satellites, there is an enormous risk that one of those artificials moons suddenly decides to take a stroll and crashes into your home. I think you’ll agree with me that this would be disastrous - all your precious data would be lost! Your holiday pictures, important documents for school/work and your music collection - all gone!
Of course, you have to protect yourself against catastrophic situations like the one described above (and against hard drive failures). If you’re anything like me, you have no backup solution set up, and though you want to set it up, you keep postponing really taking that step. Well, now is the time. In order to write this guide, I set it up for myself, so now it’s your turn while reading this guide. And let me tell you, once you free up those minutes to set it up, you’ll be glad you did. Even if you’re never going to need it, it feels a lot better knowing that you’re prepared for eventual bad luck.
You need a place to store your backups though. If you create a backup on the same drive as the original files, a hard drive failure will affect that backup just as much as the original files. For out method, the destination can either be another hard drive or a remote directory (through SSH or FTP). If you don’t know what any of these mean, then you probably do not have access to it. Unfortunately, this means that you will not be able to create a backup. If you do possess one of these, read on ![]() .
.
The destination I’ll be using is an internal hard drive that used to hold a secondary and lesser-known operating system. Its capacity is a mere 20 GB, so I’ll only be backing up my most important files. Of course, if you happen to have an external 160GB hard drive laying around, be sure to use it to the fullest.
Introducing… SBackup!
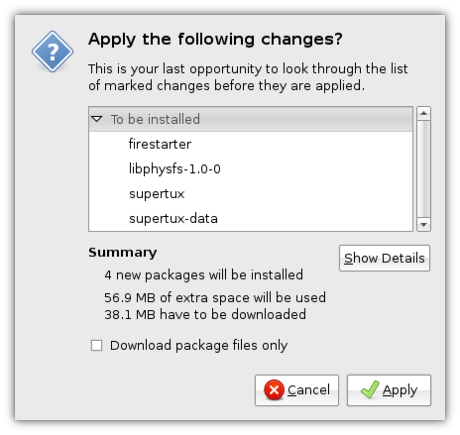
A quick search using Applications->System->Add/Remove... (with “All available applications” enabled in the top right-hand corner) for backup turns up a few backup solutions. The application we will be using, which also happens to be the most popular one, is Simple Backup, or SBackup. SBackup is a complete solution, able to automatically create backups at set intervals, keeping the backup size as low as possible. Listed are Simple Backup Config and Simple Backup Restore, which allow you to backup and restore your backup respectively.

Selecting one will also select the other because, obviously, we need to create backups in order to restore them.
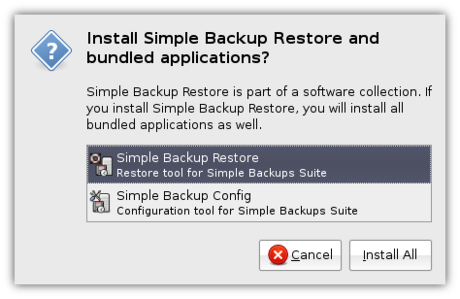
With both selected, click Apply Changes and finish the installation as usual.
Once the installation has finished, you can find SBackup’s configuration utility under Applications->System->Simple Backup Config.
Setting it all up
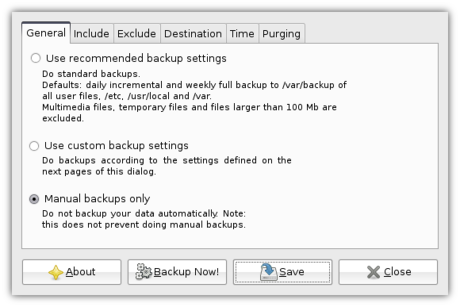
By default, SBackup is set up to only perform backups when you tell it to. However, for maximum security, we want it to automatically create a new backup every so often, and now and then delete old backups in order to save space. To make sure the backups are created exactly the way you want it, select Use custom backup settings.
The first thing to do is selecting which files you want to be included in the backup. This can be done under the Include tab on top.
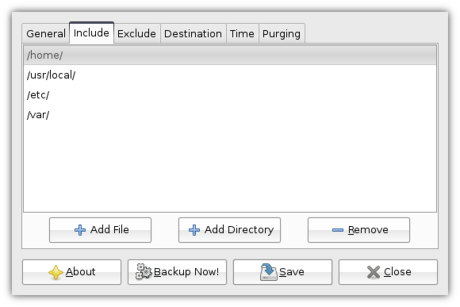
SBackup comes with a few useful defaults, however, considering the size of my backup drive, I decided to only backup the /home/ directory, which contains the documents and settings of every user on the system. Do include the defaults if you have enough room, though.
Next is deciding which files you do not want to be included in the backup, which can be done under the Exclude tab. You can use the preferences in this tab to exclude any files which you do not regard of enough value to justify the amount of space they’d consume in the backup.
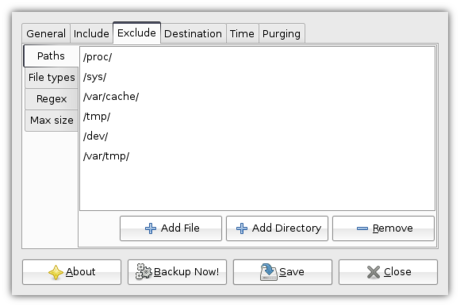
The Exclude tab, in turn, contains four other tabs on the left-hand side.
The first one is the Paths tab, which allows you to exclude complete directories. I left it at the defaults since I had no specific directories I wanted to exclude, and I also felt no need to include the directories listed as excluded by default.
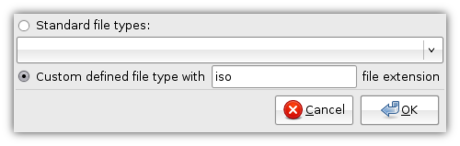
Moving on to the File types tab, though, there were certain files I could not afford to backup. A lot of multimedia files were already excluded, which was fine to me - I cannot afford to back up my (measly little) music collection. However, I often help testing new versions of Xubuntu. This involves downloading complete CD “images” (files that can be put on a CD) which can be up to 700 MB in size. The names of these images always end in .iso, and since there is no need for me to keep them that long, I clicked Add and opted to exclude files with the iso extension.
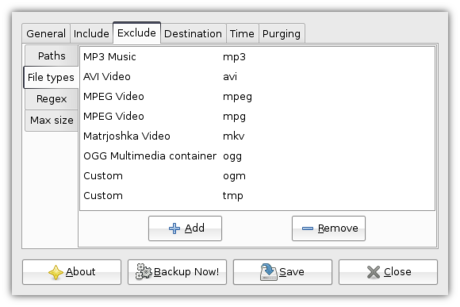
The Regex tab is not that interesting for this guide, since those who know what it does, are able to figure it out by themselves.
The Max size tab is very useful though, because it allows you to set a maximum size for files to be backed up, which comes in very handy in preventing your backup from growing too big.
We then move on to the Destination tab on top. This tab allows you to, as its name implies, set the destination for your backup. You can set up a remote directory at the bottom - I’ll be setting a custom local backup directory.
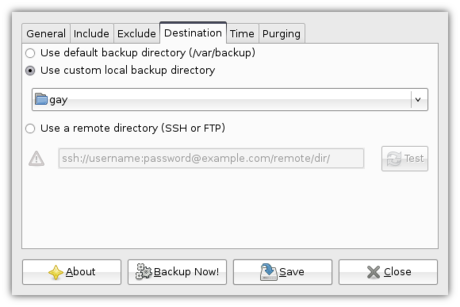
I located my external hard drive in the /media/ folder, by the name hda1. It is also listed in my left pane in Thunar (the file browser) as 20G Volume. In there, I created a new folder (/media/hda1/gay/, with gay being the name I gave my computer during installation, but feel free to use whatever you like) to hold my backups. Then I selected Other… in the drop-down menu and selected that folder.
Next up was configuring when the backup is to be ran in the Time tab.
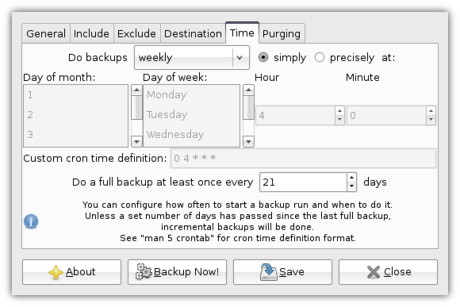
Since I do not have that much space I opted for weekly backups, but of course, the best way to go would be daily. Since I do not leave my computer on 24/7 I cannot set it to create a backup in the middle of the night, so I opted for “simply”, which supposedly means “as soon as the computer is running, with the previous backup being made at least one week ago”.
The last tab, Purging, allows you to configure how long you want to keep old backups.
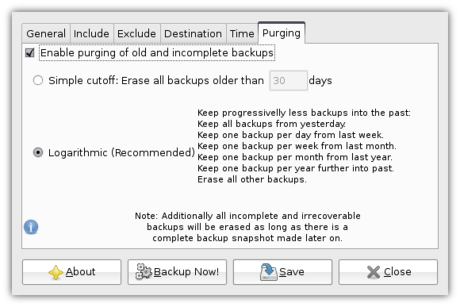
Mostly, you’ll want to select “Logarithmic”, being the most efficient and recommended method, but if you want to select an exact number of days to keep old backups, that’s possible to.
After finishing the configuration, click “Save” to, well, save your configuration.
Let’s back things up
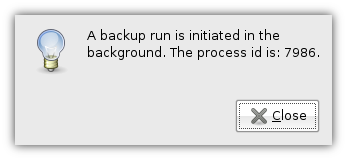
Of course, I immediately wanted to make my first backup. For that, SBackup comes with the extremely handy “Backup Now!” button ![]()
Clicking that popped up a window, saying: A backup run is initiated in the background. The process ID is: 7986.
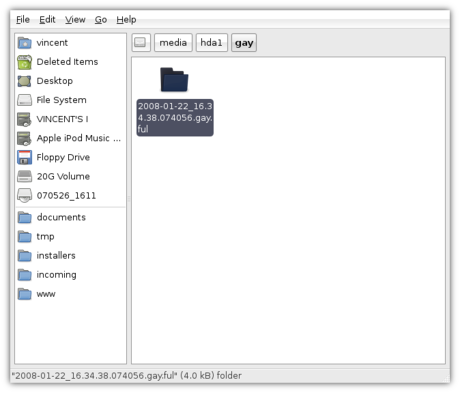
Well, that’s it really - now you can close Simple Backup Config. The backup is being created, and the next one will be created after the period you selected ends. Opening the folder you selected as the destination (/media/hda1/gay/ in my case) will show you that a new directory has been created which will contain the backup.
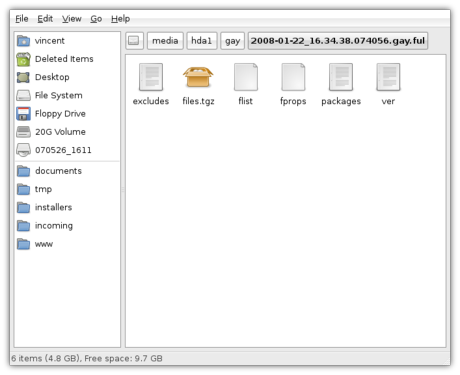
If you take a look at a later time (once the backup has been completed), you will see that that directory has been filled with files containing information about the backup, and files.tgz which contains the backed-up files.
Restoring a backup
Restoring the backup is very easy, too. Open up Applications->System->Simple Backup Restore, from where you can select the location of your backups.
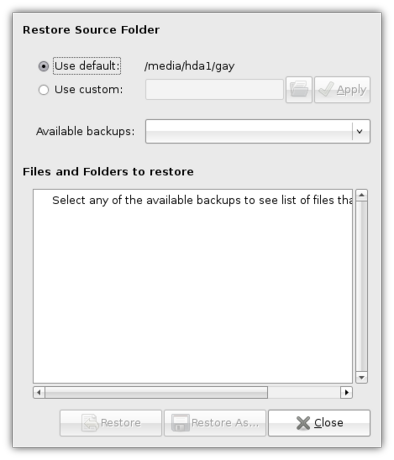
A drop-down menu “Available backups” provides you a list of all available backups. Selecting one of them will present you with a list of files included in that backup, clicking “Restore” will restore those files in their original location, “Restore As…” allows you to select a different location.
Conclusion
It was about time you created yourself a backup, and tell me: doesn’t it feel wonderful? Simple Backup is an excellent tool that, despite not being as good-looking as Apple’s Time Machine, definitely provides a complete solution for backing up your documents.
And by the way, with this being my first post of 2008, let me wish you all the best for the coming year. 2007 was an magnificent year for this blog, having survived into 2008 since its conception in 2007. There’s no complaining about the number of visitors, too: at the time of writing, with just 24 posts (this being the 25th), I’ve received a total of 116 798 views, with about 500 to 600 views a day recently. Furthermore, I believe it’s also been useful to a few people, which was the reason for starting this blog in the first place.
On the personal level, it also was a fantastic year. My mother’s ex, who was a massive burden to me, finally left (he lived here since I was about thirteen years old), enabling me to develop tremendously as a person, which I expect to continue in 2008. My writing style has also improved - another trend which I hope will continue in 2008.
All in all, let’s make 2008 another awesome year, and of course, if you got any further suggestions, be sure to make it known ![]() .
.


Software installation
What used to be one of the most troublesome aspects is nowadays one of the greatest advantages of almost every Linux distribution: software installation and updating. Xubuntu and Ubuntu are no different.
The problem used to be that, in order to install one application, you needed to install a lot of other software (dependencies) in order to get it to work, which meant a lot of work just to install that single application. On top of that, the installation of that application and its dependencies wasn’t a matter of double-clicking an icon - no, you had to open a terminal window, move to the location of the installation files, type ./configure, find out what software you were missing, then… Let’s just say it was a lot of work ![]()
The developers of Debian, the Linux distribution on which Ubuntu is based (on which Xubuntu is based ![]() ), thought of a solution: they’d bundle the application in so-called packages in which they could store a lot of information about that software, such as which other packages it needed. They then created an application called
), thought of a solution: they’d bundle the application in so-called packages in which they could store a lot of information about that software, such as which other packages it needed. They then created an application called apt (Advanced Packaging Tool) which could automatically download and install the package and all the packages marked as its dependencies! This is often referred to as package management.
Along with solving the problem of dependencies, this solution had a few other advantages. For one, since apt-get would by default download the packages from one location in control of the Debian developers, you could be quite sure that they were free of viruses. The biggest advantage, however, was that apt-get could check for updates to all packages at once, meaning it takes just one action to get the latest version available of every single application you had installed!
There were downsides too, though. For example, the Debian developers are unable to create a package for every piece of software that is available for Linux (According to Wikipedia, though, Debian has over 26 000 packages, so most of the popular applications are there ![]() ). Furthermore, Debian’s package management system wasn’t the only one: Red Hat’s Red Hat Package Manager is an example of another popular packaging method. Ubuntu uses Debian’s method; however, since Ubuntu’s goals differ from Debian’s, they provide the packages from a different location, which means that you cannot just install the packages made for Debian (though often it is possible). However, as Ubuntu can often copy Debian’s packages with very little modification, they offer about 23 000 packages.
). Furthermore, Debian’s package management system wasn’t the only one: Red Hat’s Red Hat Package Manager is an example of another popular packaging method. Ubuntu uses Debian’s method; however, since Ubuntu’s goals differ from Debian’s, they provide the packages from a different location, which means that you cannot just install the packages made for Debian (though often it is possible). However, as Ubuntu can often copy Debian’s packages with very little modification, they offer about 23 000 packages.
As a result of these different methods in different distributions, an application cannot just offer “a Linux version” - at most they will allow you to download “the source” which you can install in the old and painful way. You can see this on the download page of Wormux where they link to a special page with instructions on installing it on many different Linux distributions.
Though there are many efforts like Autopackage, PackageKit, klik, glick, Smart Package Manager, Zero install and OBLISK, the native tools are still preferable.
As for Debian’s method, a graphical tool called Synaptic was also developed, and if that wasn’t enough, the Ubuntu developers also created the tool Add/Remove… (or gnome-app-install) which made the installation of packages even easier. As per Will’s request I’ll guide you through the basic process of package installation on Xubuntu and Ubuntu, and of course, if you have any questions you can leave a comment.
Software sources
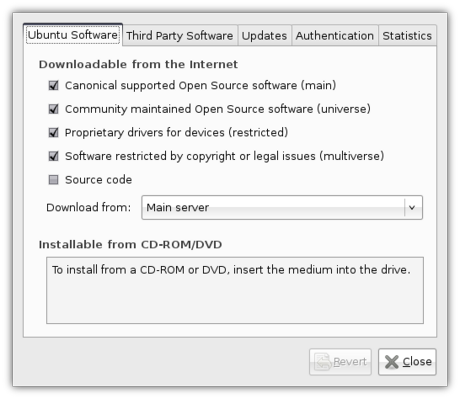
The central place for configuring your package management is in Applications->System->Software Sources. As the name says, this application lets you configure the software sources (repositories): the place where Xubuntu downloads all the packages from. By default only a small portion of all available software is enabled. For full access to all 23 000 packages from the Ubuntu repositories you will want to enable the community maintained open source software, proprietary drivers for devices (not open source) and software restricted by copyright and legal issues (this includes e.g. support for playing MPEG videos which Xubuntu is not allowed to ship by default worldwide).
Then there’s the Third Party Software tab, which allows you to enable non-official repositories such as the Personal Package Archives by members of the Ubuntu community. Such third-party repositories often give you a line like:
deb http://ppa.launchpad.net/jani/ubuntu gutsy main
By clicking Add you can enter such a line and then you have access to all the packages provided in that third-party repository. Note that it is recommended that you stick to the official Ubuntu repositories since these repositories might install newer versions of certain packages which can break other packages, or they might not support newer versions of Ubuntu and Xubuntu which might cause problems when you want to upgrade to a newer version.

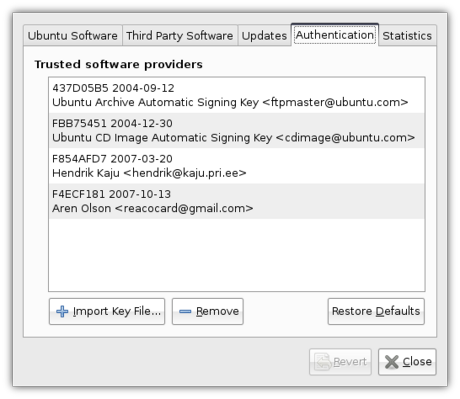
These third-party repositories often provide you with their GPG-key, which you can add in the Authentication tab in order to confirm that you trust them. Whenever you update the list of packages from that repository, Xubuntu will check whether this key is still available so as to know it is still the same person that provides the packages.
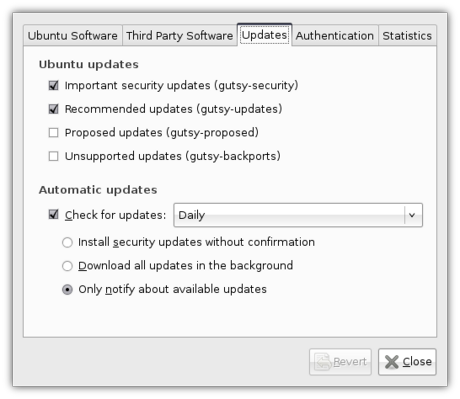
In the Updates tab you can configure which updates you want and how often you want updates to be checked for. Obviously it is highly recommended that you enable the security updates, and you’ll most likely also want the recommended updates. The proposed updates are updates that haven’t yet been thoroughly checked. Unsupported updates can provide you with newer versions of applications that also provide new features, which were only packaged for newer versions of Xubuntu.
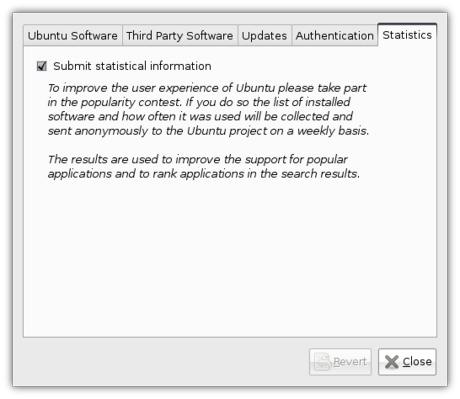
The last tab, Statistics, might not provide direct benefit to you, but it allows you to automatically submit anonymous information about which packages you have installed and how often you use your applications. Statistics are then made available at http://popcon.ubuntu.com/ where they can help the developers and packagers.
Add/Remove…
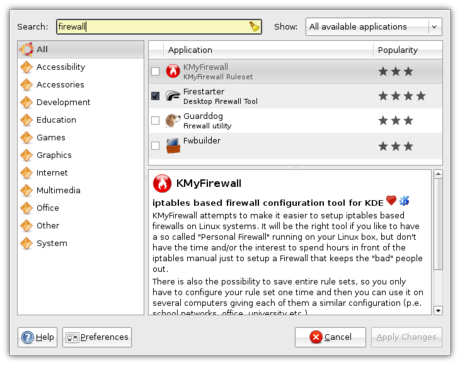
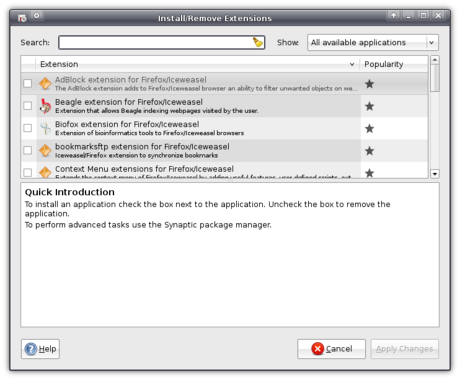
Ubuntu’s Add/Remove… tool is a great way for you to discover new software to install (Applications->System->Add/Remove...). Applications are sorted in categories and come with an extensive description about what it does. There are also plans to expand this tool’s capabilities to show screenshots, reviews and more, but for now, you’ll have to do with this ![]()
In the top corner on the right-hand side, you’ll see a drop-down menu. This menu is a quick way to configure the software sources - again, to have access to the widest available range of software, you’ll want to select “All available applications” here. Clicking Preferences in the bottom left-hand side will take you to the Software Sources configuration window.
You can easily find new applications by searching using the input field at the top. For example, a search for “Firewall” will turn up a list of Firewalls. Installation and uninstallation of applications is easy too: just check or uncheck the checkbox in front of an application’s name, and when you’ve selected all desired changes you click Apply Changes in the bottom right-hand side.
Synaptic
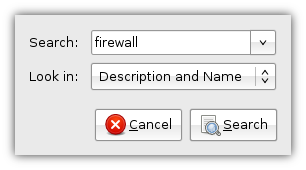
A more advanced tool is Synaptic (Applications->System->Synaptic Package Manager). By clicking the Search button on top you can search for applications: if you already know a package’s name I recommend you to just search on Name as it is notably faster than Description and Name.
Once you have found the package you want to install or uninstall, you can click the checkbox in front of its name. You can then “mark” a package for a certain action, which won’t be performed until you click Apply on top.

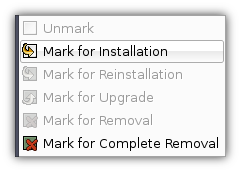
If a package has dependencies you do not yet have installed, Synaptic will ask you whether you also want to mark those packages for installation.

Once you click Apply on top, Synaptic will give you an overview of all the package it will install and uninstall. Once you click Apply again it will take care of the installation and notify you when it’s done.
Gdebi
Unfortunately, sometimes a package is just not in the repository. However, an application might still provide you with a package that you might want to install by hand. Or perhaps you want to install an application from the popular site GetDeb.net which, for example, packages a lot of games not available in the Ubuntu repositories. Or perhaps you want to install a package you downloaded from packages.ubuntu.com, which provides all the packages from the Ubuntu repositories, after you transferred them to a computer without internet connection.
For this, Xubuntu comes with the Gdebi Package Installer. Gdebi will be opened when you double-click on a .deb file (the package). It can also download and install dependencies - all it takes is a click on the Install button on top.

Conclusion
Whenever a newer version of a package is available in one of your software sources, you will be notified that an update is available and asked whether you want to install it, or perhaps it will automatically install it in the background, depending on what you set.
As you can see, software installation in Xubuntu and Ubuntu is extremely user-friendly. After having used it for a while, you start to wonder how other people get by checking the websites of every application they want to install or update ![]()


Git-svn Xfce Repositories
I recently started messing around with git, partly just to see what all the fuss is about, and partly because I want an easy way to do ‘offline commits’ when I don’t have an internet connection (I spend a decent amount of time on planes and in airports, and sometimes in wifi-less cafes with my laptop). I’ve looked at SVK, but I’m not a huge fan, and it seems ridiculously complicated for what it does (or rather, what I need it for). It also means learning another tool that’s only useful for a very small thing.
So: git. It’s been hyped like crazy since its inception, and frankly I’ve avoided it mainly because of the hype. But I’m surprised at how much I like git. Being able to have lots of little throwaway branches to do various related tasks on is really useful, and merging them back to the main branch is trivially easy. The offline operation is obviously a great bonus.
To make things even better, I was absolutely thrilled when I found out that git comes with a sub-app called ‘git-svn’. In a basic sense, it’s a ’svn2git’ script that lets you import all of your commit history from a svn repository into a git repository. But it’s so much more. It’s bidirectional, so after you create the git-svn repository (which is really just a git repository with a bunch of extra info to keep things in sync with svn), you can continually update your local repo as changes are made to the master svn repository, and you can push changes in your local repository up to the master svn server. And when pushing changes, it actually does one svn commit for each local git commit, so your local git history gets replicated on the server.
Anyhow, git-svn is a little hard to figure out at first, so I figured I’d ‘convert’ all the Xfce core core modules into git-svn repos and post them so other people don’t have to figure it out. Also, doing the conversion over a network via http or svn+ssh takes quite a long time (and wastes quite a lot of bandwidth), and I can do them locally on the svn server. You can grab them here. Please read the README in its entirety first, as these repos will not work properly with the Xfce svn repo out of the box, and there are a few extra git commands you’ll need to know to interact with the svn server.
Good luck and enjoy. If you have issues with them, please don’t comment here, and don’t email me. Email the Xfce dev list instead.
Xubuntu + Compiz = Pretty pretty Xubuntu
With the release of Xubuntu 7.10 “Gutsy Gibbon”, Xubuntu looks better than ever. However, it can look better still, with the breathtaking effects provided by Compiz. How would you like all your windows zooming out into little thumbnails to give you an overview a la Mac OS X’s Exposé? Or what about flipping through your windows Cover Flow-style (or Flip 3D-style, for that matter)? And then you haven’t even experienced the joy of your windows casting shadows on your desktop, or wobbling like jelly as you drag them!
And that’s just the tip of the proverbial iceberg as there are many more features for you to discover - after you’ve installed it using this guide :).
Note to users of 8.04: flotoonie and Ivotron report that this guide also works for Xubuntu 8.04 “Hardy Heron”.
Preliminary note: your graphics card should support it. Most cards from Nvidia and ATI are supposed to work, as well as some cards from Intel. Most likely you will need to enable the proprietary, non-open source drivers using the Restricted Drivers Manager in Applications->System->Restricted Drivers Manager.
You can check whether you system can run Compiz using Compiz Check.
Before we start, I should also note that Compiz has not made a stable (i.e. 1.0) release, and undoubtly you will experience bugs yourself. This could include the occasional crash, your window borders disappearing (you can get them back by pressing Alt+F2 and entering “emerald” or, if that doesn’t work, “xfwm4″), windows being black in their entirety, or even being thrown out of your graphical environment completely. Be aware of the risks, and don’t blame me if it breaks ![]() .
.
A bit of history would be appropriate, so here goes. You can skip this paragraph if you already know what Compiz and Compiz Fusion are and just want to install them.
Developed within Novell (they bring you SUSE Linux) they released Compiz, a window manager with gorgeous effects to demonstrate their new XGL software which allowed better use of hardware and made these effects possible. Compiz became an independent project and kept adding astonishing new effects. As Red Hat (who bring you Red Hat Linux) developed AIGLX as an alternative to XGL, Compiz didn’t even need XGL anymore. A community formed around Compiz that made lots of useful and not-so-useful (but pretty) additions. One particular group of enhancements were not accepted into the main project and, being open source, a spin-off named Beryl that did include the enhancements was started. Beryl became very popular - perhaps even more popular than Compiz itself. However, both projects were dissatisfied with the duplicate work and found that they could settle their previous arguments. In a re-merge, most of Beryl’s plugins were made to work on Compiz under the name of Compiz Fusion. So now we have Compiz (or Compiz-core), the base system, with Compiz Fusion, which provides many additional, perhaps more experimental, plugins.
We will install Compiz as well as Compiz Fusion from the official software sources which will no longer pull along half of Gnome as it did in the previous version of Xubuntu.
A word of thanks goes out to Forlong who wrote a guide titled “How to install Compiz Fusion on Ubuntu Feisty - tutorial for advanced and/or KDE as well as Xfce users” - about the only guide that explains how to install Compiz on Xubuntu (up until now, that is ![]() ). Whereas his tutorial
). Whereas his tutorial focus[es] mostly on terminal commands
I’ll explain it like I usually do - the graphical way, with loads of screenshots. Do use his excellent tutorial if you prefer using terminal commands. Be sure to note, though, that his tutorial is for version 7.04, so you’ll have to replace “feisty” with “gutsy”.
Let’s start, shall we?
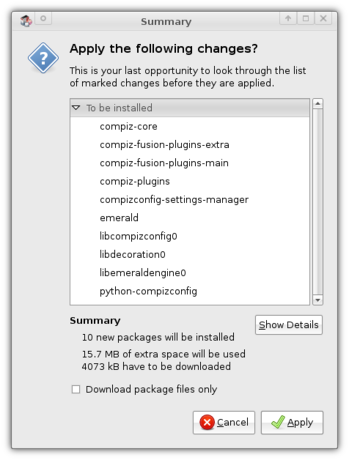
Note: If you rather copy and paste a command into a terminal window, use this: sudo apt-get install compiz-core compiz-plugins compiz-fusion-plugins-main compiz-fusion-plugins-extra emerald compizconfig-settings-manager
Fire up Applications->System->Synaptic Package Manager to install the required packages. First of all, we need compiz-core. This is just pure Compiz as opposed to the compiz package which pulls along half of Gnome. Then, of course, we need the plugins that take care of all the bling - don’t worry, you can select which plugins you want to activate ![]() . We need the packages
. We need the packages compiz-plugins, compiz-fusion-plugins-main and compiz-fusion-plugins-extra. Furthermore, you might like the application to draw the window borders, Emerald, instead of Xubuntu’s default xfwm4 (if you’re unsure, you’ll probably want it). If so, select the package emerald. Last but not least, we need an application to configure Compiz to be usable, so select compizconfig-settings-manager too.
Having selected them all, you can click Apply to start the installation.
Setting it up
Before you can run your newly installed Compiz, you need to configure it a bit. In order to do so, open Applications->Settings->Advanced Desktop Effects Settings.
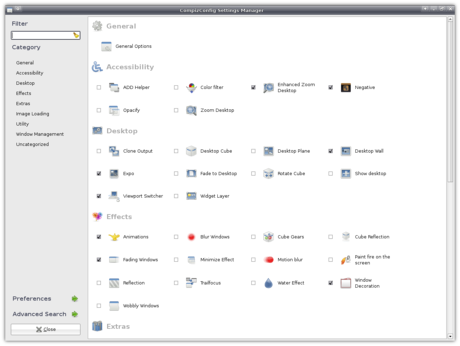
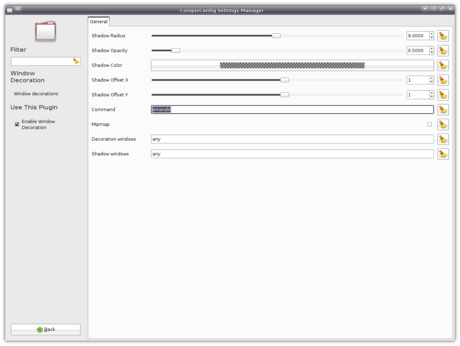
Beneath the “Effects” heading, click Window Decoration. In the Command input field, enter the window decorator you prefer (emerald if you installed that, xfwm4 if not).
Well, that’s about it - let’s try running it!
Running Compiz
Only one way to find out whether everything works as expected - run it! In order to do so, press Alt+F2, enter compiz --replace, then click Run. If everything works as it should, you should now see shadows around your windows!

Make it default
Now I’ll just assume that it ran successfully and that you want to have Compiz run by default every time you login. I’ll cover two ways to do that.
The easy-but-inefficient way
Using the first way Compiz will replace your default window manager every time you login. This means that, when you log in, first xfwm4 is ran which will then be replaced by Compiz, so even though xfwm4 is started, it will then be closed again without being used.
For this method, you open Applications->Settings->Autostarted applications.
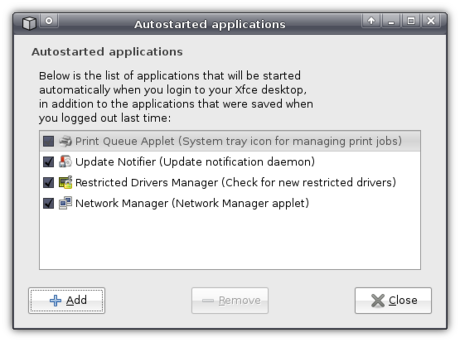
There, you click Add to create an entry with the following values:
- Name:
- Compiz Fusion
- Description:
- Desktop Effects
- Command:
compiz --replace
Well, actually, only the last entry really matters ![]()
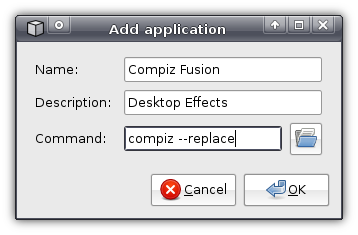
Click OK and you’re done! The next time you login, Compiz will be started automatically.
The more-difficult-but-better way
So… You prefer the scary stuff? Well, it’s not that difficult, actually. You just press Alt+F2 and enter
gksudo "mousepad /etc/xdg/xfce4-session/xfce4-session.rc"
Basically, that opens the file xfce4-session.rc with root rights with the text editor mousepad.
In this file, all you have to do is replace:
Client0_Command=xfwm4
…with:
Client0_Command=compiz
(Thank Ubuntuforums user sisco311 for this one)
Do note that this makes Compiz default for all users, as opposed to the previous method which made it default just for you.
Take it easy
CompizConfig allows you to tweak a lot of the settings, which might be a bit overwhelming. Therefore you might feel the need for some sane defaults. Luckily, CompizConfig, in the Preferences menu, allows you to import and export profiles.
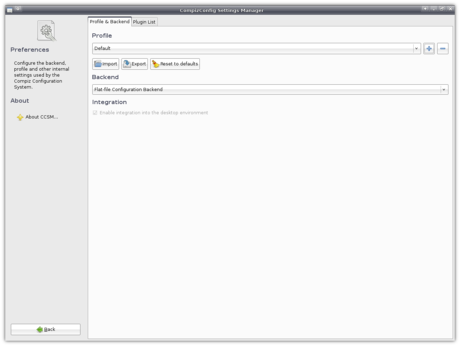
As you can guess, I’ve exported mine, so go and download it and Import it!
Troubleshooting
It might just be that it does not work for you - please say so using the comment form below, then I can share the solution with the world:
- If you experience problems that you cannot solve using any of the methods above, you can revert back to Xfwm4. Of course, how to revert depends on the method you used. If you used the easy-but-inefficient way you can simply uncheck the checkbox before Compiz Fusion in
Applications->Settings->Autostarted Applications. If you used the more-difficult-but-better way you have to open that configuration file again (gksudo "mousepad /etc/xdg/xfce4-session/xfce4-session.rc") and replaceClient0_Command=compiz…with:
Client0_Command=xfwm4Note that this will not uninstall Compiz - it will merely disable it.
- If nothing happens after you have followed all the steps, it might be that you need XGL for it to work (Xubuntu by default includes AIGLX). You can simply install it using Synaptic - look for the package
xserver-xgl. - Ivotron reports what’s happening when you do not have window borders and how to solve it:
For those not having window decorations after following all the steps try first by removing the contents of the .cache/sessions/ folder as mentioned by Rob Hodge.
Then, on Settings->Settings Manager->Sessions and Startup, check that ‘Automatically save session on logout’ is disabled. Also, check that if you have the ‘Prompt on Logout’ option is enabled, when you actually log out, the checkbox that appears below the ShutDown, Restart, etc.. buttons isn’t checked.
What happens is the following. If you like (as I did) to save your session so that the next time that you log in all the programs you had running appear again, this will also include the autostarted (from the xfce4-session.rc file) compiz. Then, when you log out and log in again, the XFCE session manager will try to run compiz twice (one from the xfce4-session and another from the last session), causing (at least that’s what happens to me) that the emerald window decorator never gets started (or something alike like killed by the –replace flag).
So, the conclusion. Follow all the steps, stop saving sessions and use the autostarted applications configuration instead.
- If Compiz doesn’t work and you have an Nvidia graphics card, then you may need to make sure it is configured correctly. You can do so by pressing Alt+F2, typing
sudo nvidia-xconfig --add-argb-glx-visuals -d 24and pressing “Run”. With thanks to Ransom’s comment. - If you are left with just one desktop, you have to set the “Horizontal Virtual Size” in
General Options->Desktop Sizein the Cube settings. - Rob Hodge also had a problem:
i couldn’t get it to work as the default setup.. it kept loading xfcewm instead of compiz or loading no window mqanager at all. so iâ€d sometimes be left with no decoration as the major noticable effect. this was even after changing the xfce4-session.rc file.
He solved it by opening a terminal window (
Applications->Accessories->Terminal) and typing:
rm ~/.cache/sessions/*
WARNING: After pressingEnter, this command will remove your saved session (i.e. the state saved if you checked “Save session” on logging out previously). If you don’t know what I’m talking about then it’s probably no problem. - Crewe did not have window decorations. Though the steps he took are quite complicated, and he needed to install Metacity, GNOME’s window manager, he solved his problem. I am not sure whether this will work for you, and it is probably safest to assume it won’t. For those still interested:
A run down of what I did was first
installed all the apps I needed:
sudo apt-get install compiz-core compiz-plugins compiz-fusion-plugins-main compiz-fusion-plugins-extra emerald compizconfig-settings-managerI removed nvidia-glx / nvidia-glx-new as they directly conflicted with my nvidia drivers, and put me into “Low Graphics Mode†and caused all sorts of issues with the xserver.
sudo apt-get remove nvidia-glx –purge
sudo apt-get remove nvidia-glx-new –purgerespectively.
installed metacity:
sudo apt-get install metacityrestarted the computer (this is key)
then made sure I had a fully functioning xorg.conf that I created from mish-mashing the generated
configs from the following commands:sudo nvidia-xconfig
sudo dpkg-reconfigure -phigh xserver-xorg
nvidia-settingsand everything was working graphically, and I was using the restricted drivers, with nothing was crashing.
Then I added these entries to my xorg.conf
Section “Extensionsâ€
Option “Composite†“Enableâ€
EndSectionand
Option “AddARGBVisuals†“Trueâ€to the Device section
I then reinstalled the nvidia drivers
sudo nvidia-installer -f-fforces the install, when the install asks you if you want it to generate and xorg for you SAY NO! (You just spent a lot of time creating a working one)then restarted the computer again.
it’s still a bit finicky as I had to run it twice to get it to work, and afterwards I can’t switch back to xfwm4 but it’s I small price to pay.
UPDATE: I’ve since uninstalled metacity, and everything seems to be working great
Of course, you can always read the comments for this post to read everybody’s problems/solutions or general tips.
That’s all folks!
Just because Xubuntu is speedy doesn’t mean it should not look pretty. With the release of 7.10, finally Compiz is no longer exclusively Ubuntu’s. Enjoy the looks!


Xfce 4.4.2 released
Yesterday Xfce 4.4.2 was released. Now I have to find some time after work to get it into Foresight.Hopefully I can cook it tomorrow night. One step closer to the Xfce Edition.
All green
I'm working a bit on Xfce Edition of Foresight Linux (isn't it green), so I decided, that there might be news worthy to write about but don't expect something interesting here, I'm pretty bad at blogging.Installing Xubuntu
When I installed Xubuntu 7.10 “Gutsy Gibbon“, I could not resist the urge to create a walkthrough for installing Xubuntu. It took me a while to write it up, but here it is. (Note: I have also written a review of Xubuntu 7.10)
Since Xubuntu uses the same installer as Ubuntu and Edubuntu, Ubiquity, this guide also applies to them, and Kubuntu’s installer is basically the same, so it also gives you an overview of what Kubuntu’s installation looks like. Also, the installer has not changed since the previous version, 7.04 “Feisty Fawn“, so it applies to that version too.
To start the installation, you just click the Install icon on the desktop once it is booted. However, I wanted to configure my internet connection first, because that way I would immediately be able to install language packs and whatnot. Note, though, that you can also complete the installation without internet connection.
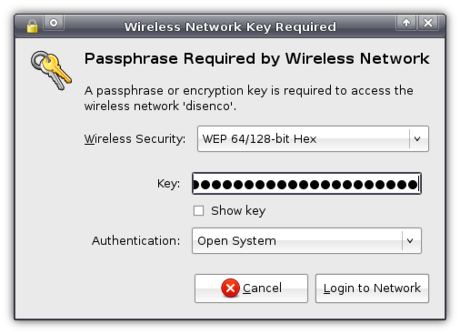
In order to configure my wireless connection, I click the NetworkManager icon in the top right-hand side. It then pops up a list of detected wireless networks and has an entry listing my wired card.
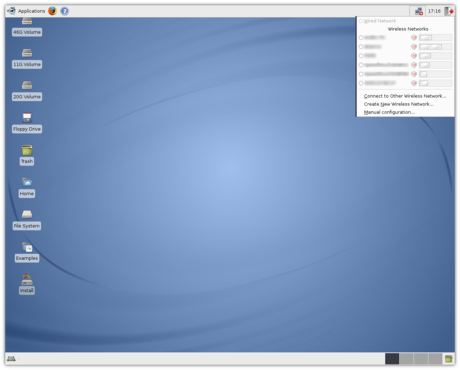
Simply clicking the network I want to connect with, it prompts me for the passphrase. I can then click Login to Network and I am connected! It couldn’t be easier ![]()
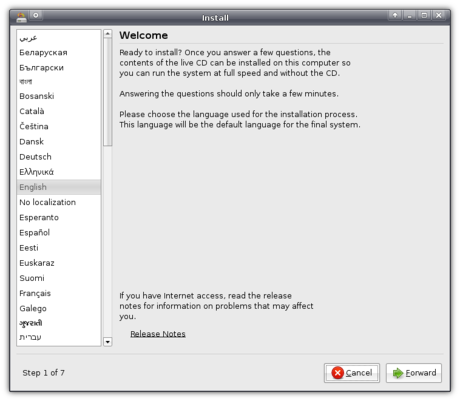
Now that my network connection is all set, I can start Ubiquity (the installation application, remember?). The first screen allows you to select a language and links to Ubuntu’s release notes.
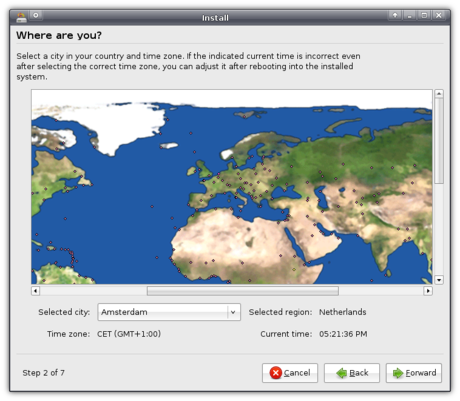
Clicking Forward brings us in the timezone selection screen, where we are presented with a map of the world.
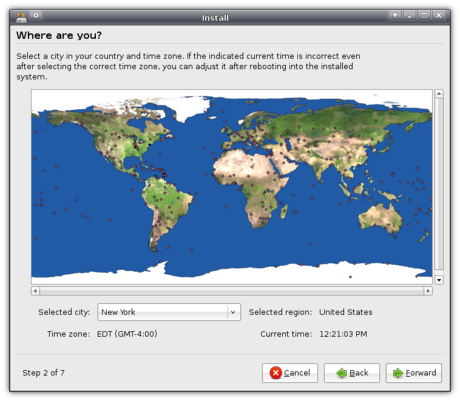
Clicking the area on the map where you live zooms in the map making it easy to select your location.
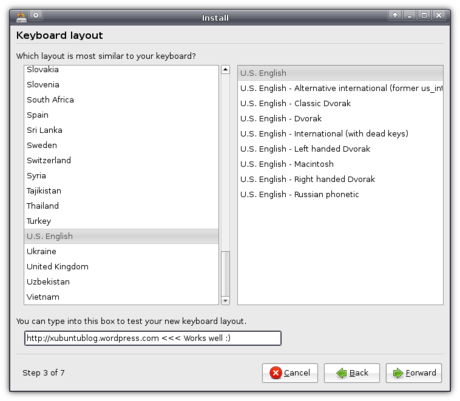
Clicking Forward again presents us with a screen to select your keyboard layout. It includes many options, including many Dvorak ones (note to self: get to learn to type using Dvorak). An input field allows you to test the selected layout.
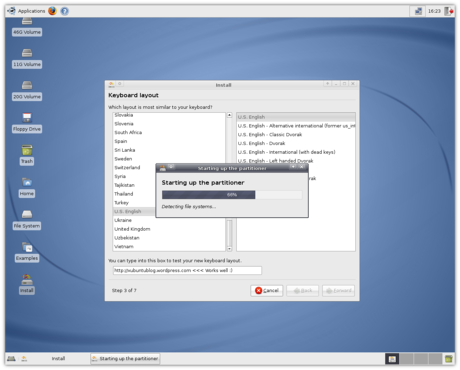
Yet again clicking Forward, a dialog box pops up telling the partitioner is being started.
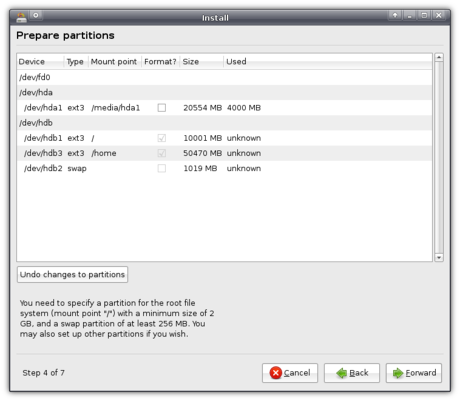
When it has finished loading, you are presented with three partitioning options:
- Guided, resizing your main hard drive using the freed up space to install Xubuntu.
- Guided - use entire disk to wipe a whole hard drive and install Xubuntu on it.
- Manual
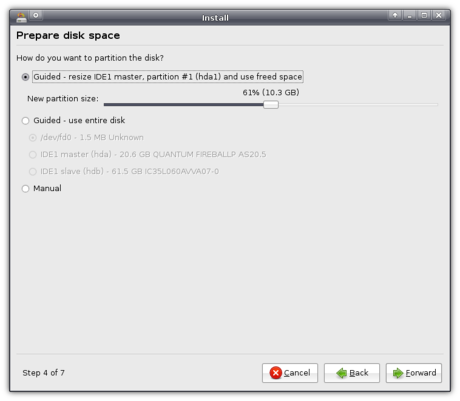
I opted for Manual.
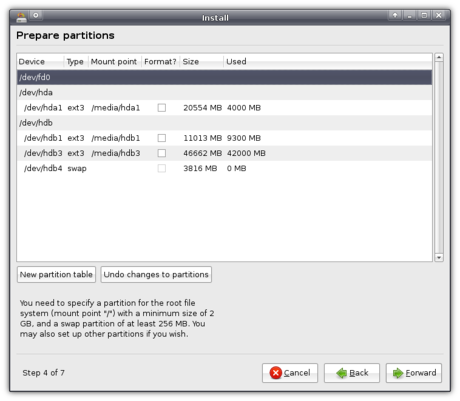
The reason for me to select Manual was because I wanted a separate partition for /home, which allows me to keep all documents and settings for all user accounts were I to reinstall Xubuntu (i.e. when a new version is released). Adding the required root (/) and swap partition I ended up with a total of three partitions.
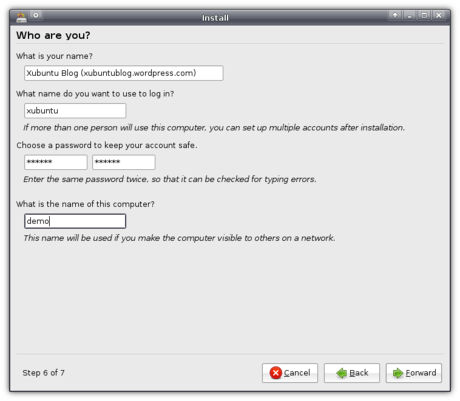
Then we need to provide Xubuntu with some user information for the first user account.
And finally, just before the actual installation will start, you are presented with an overview of everything you have selected so you can check it.
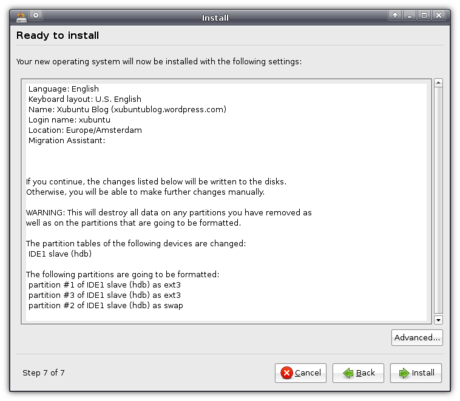
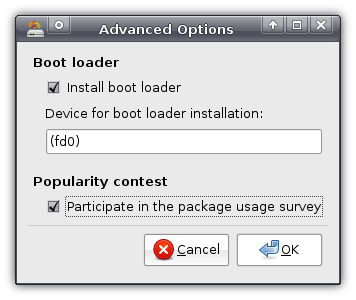
However, before you commence the installation, be sure to click the Advanced button in the bottom right-hand side. It allows you to set the location of the boot loader if you wish to, and enables you to opt in for the “Package usage survey”. If you check the checkbox, Xubuntu will send anonymous application usage data to a central Ubuntu server, so they can generate statistics about which applications are most popular. Not only does this enable the developers to improve the distribution in general, it also influences e.g. the ratings of applications you see in Add/Remove…
It will then start the installation, which will take a while.
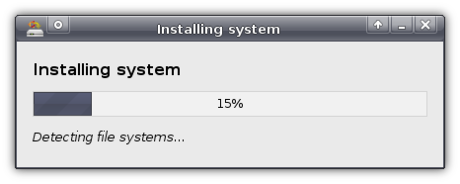
Meanwhile, and this is an awesome feature, you can continue to use the system! You can browse the web using Firefox, heck, you can even install new applications for use during that session, all while the installation is progressing!
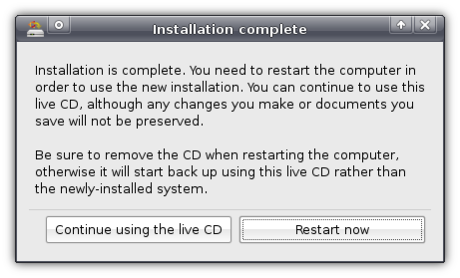
After a while you will be notified that the installation has finished, and that you should restart the computer to use it.
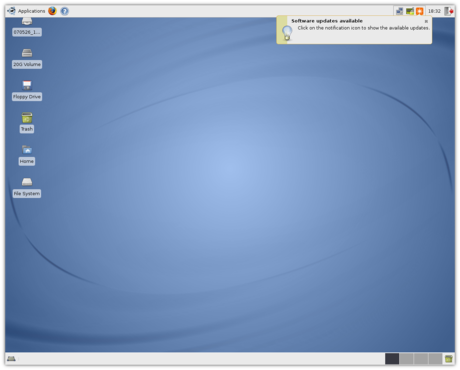
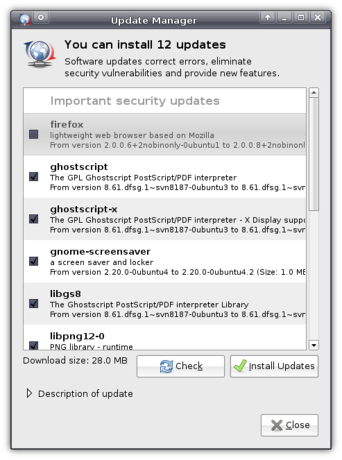
When you have restarted, with your internet connection configured, you will mostly be notified that updates are available.
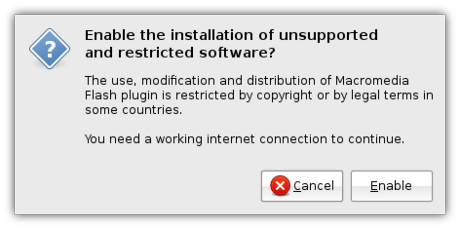
I was also notified that I had the option to enable a restricted driver. This driver is not open source, but as I would like to try out Compiz Fusion (more on that in a later post) I wanted to install the driver.
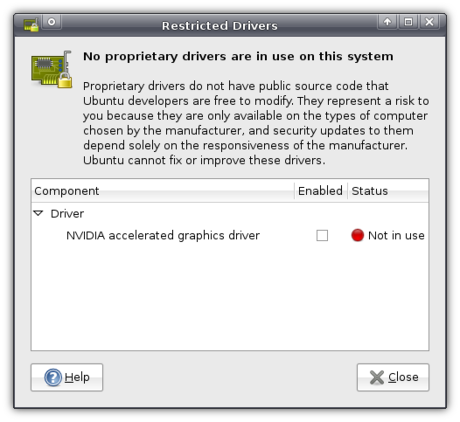
Enabling the driver was very easy - just check the box and it will start the installation.
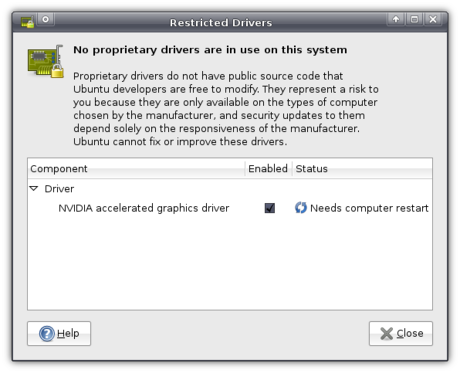
Once the installation completed, I was notified that I had to restart.
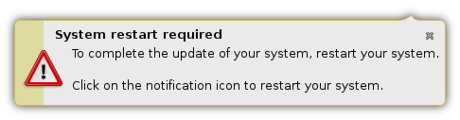
Clicking the notification gave me the option of deferring the restart to a later time, or to restart immediately.
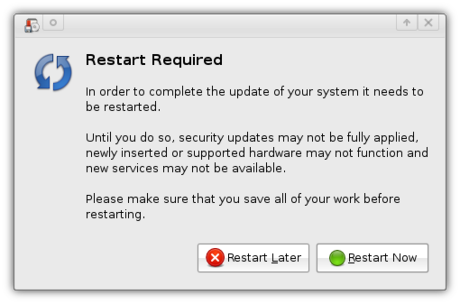
That restart was the last restart I had to do since ![]()
All in all, Xubuntu’s installation process is a breeze. The partitioning part might be a bit scary (but hey, we’ve got Wubi if it’s too scary) but overall, it’s very easy and even comfortable. Being able to use the system while it is installing is a feature that blows away every other operating system I’m aware of, apart from other Linux distributions ![]()


Marihela update
Today I was working around Marihela, and I already had the idea of what to do. It is incredibly awe-some to work with an external display. There was enough space for a well sized xzoom, gimp, and full sized terminal (shade/unshade ^_~). You can check out on my gallery.
If you wonder what the GTK+ theme is, it is Aurora-Midnight.
Download Marihela.tar.bz2.
Update: The most recent version of Marihela can be snapshotted from my gitweb interface.
This is Gutsy
As the release of the next version of Xubuntu, 7.10 “Gutsy Gibbon”, is set to arrive soon, I took a test drive with the release candidate, looking for bugs to be solved just before the final release, and to find out what’s new. This release will bring you many improvements inherited from Ubuntu but also tons of Xubuntu-specific improvements. Prepare for a long read ![]()
Oh, by the way, I also made a little screencast giving a quick overview of the new features that you can download in Ogg (recommended) and Avi formats. And yes, it’s kind of random (I didn’t prepare it), but at least you can get a quick peek at the look and feel of Gutsy.
The looks
The very first thing you will notice in this release is Xubuntu’s spiffy new theme (MurrinaStormCloud) and the sleek new background image.
To be honest, when I saw it on screenshots, I was quite unimpressed. However, once you actually get to use it, ut just “feels right”. What’s more, this theme uses the Murrine engine. Basically, this means that it will run faster and feel more responsive than the previous theme which used the Clearlooks engine.
Software updates
In the six months that have already passed since Xubuntu’s previous release, much of the software included enjoyed updates that added a few new features.
For example, Ubuntu’s Add/Remove… application, for easy installation of additional software, has had some minor improvements, mainly in the use of language.
Even though Firefox 3 has been released yet, there are some minor but very useful additions to good ol’ Firefox 2.0, provided by the Ubufox extension, allowing the installation of third-party enhancements to Firefox to be done “the Ubuntu way”.
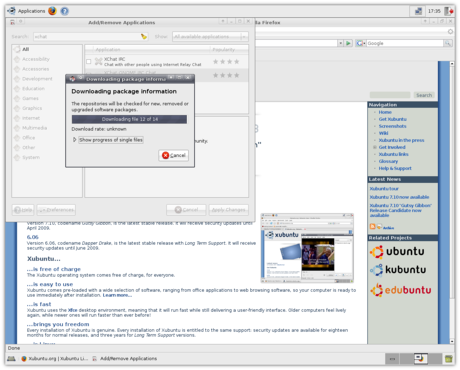
The first one can be seen when you open the Add-ons window from Tools->Add-ons. At the bottom right-hand side you will observe a link that says Get Ubuntu Addons.
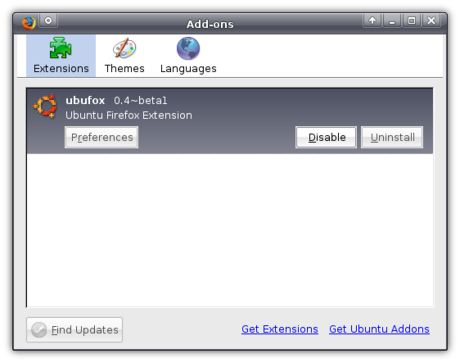
Clicking it opens the familiar Add/Remove… window from which you can browse through some Firefox extensions that are packaged specifically for Ubuntu. Don’t worry about the limited amount of available extensions though, because you can still install extensions the way you used to.
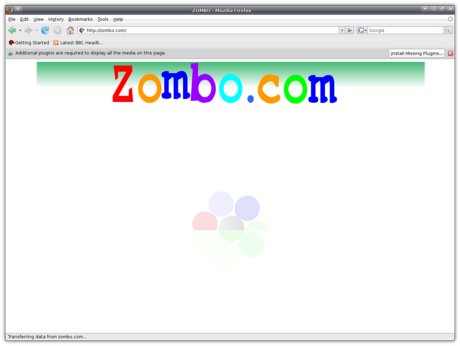
The second one takes over the installation of plug-ins (software that allows you to play certain media, such as Flash, from within Firefox). In opening a website with an element that requires the installation of a plug-in, you are presented with the normal FIrefox placeholder in place of that content. However, clicking it doesn’t open the normal Firefox plug-in finder service you are used to, but a customized Ubuntu one. For example, when you try to open a Flash file, you are presented with two available Flash plug-ins: the official Adobe one, and the open source Gnash. Since Adobe’s one supports all Flash versions up till version 9, that choice is selected by default.
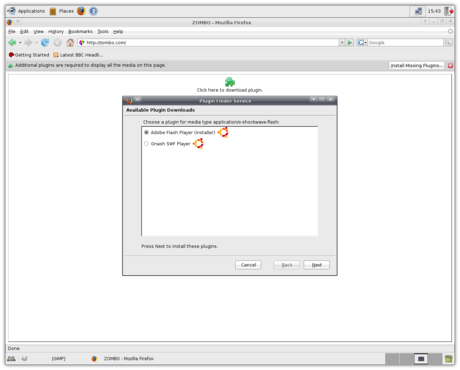
Selecting one of them and clicking Next opens a confirmation window.
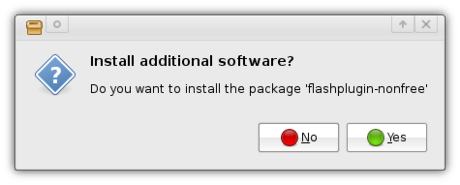
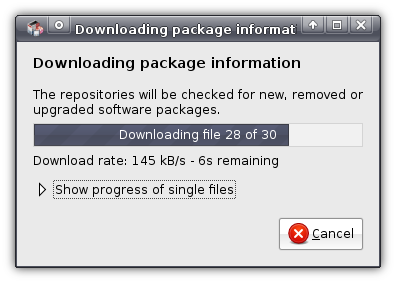
The plug-in will then be downloaded and installed the Ubuntu way.
Once it’s finished you can close the window and you’ll be back in normal Firefox, which will know the plug-in to be installed.
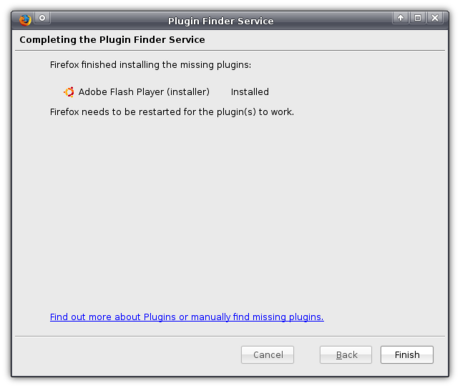
And ta-da! You can view the content you so longed to see! (It still says on top, though, that a plug-in is needed, but that will disappear when you leave the page)
Xubuntu Gutsy also ships Pidgin 2.2.0. The reason it is listed under Software updates is because Pidgin is the new name of Gaim, the Multi-Protocol Instant Messaging client (for MSN, Google Talk, etc.) which used to be included in Xubuntu. Pidgin includes support for even more protocols than Gaim used to do, so you can really keep in touch with all of your friends.
Also included is the awesome new Gimp 2.4, which is an enormous improvement over the previous version (2.2), with so many enhancements that it would be one hell of a job to list them all here. Luckily, an extensive overview of new features in the Gimp 2.4 is already available. In any case, I’m loving it already ![]()
New software
Apart from the usual software updates, Xubuntu Gutsy features a whole host of new software which will all greatly improve your user experience and does away with under-developed or featureless applications.
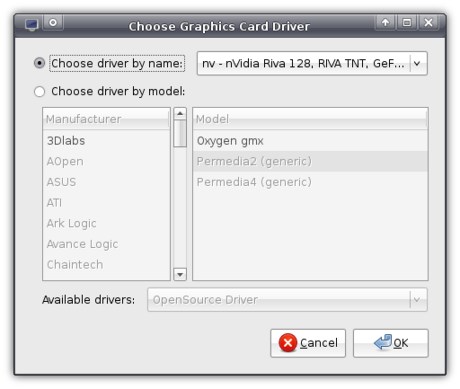
The Screens and Graphics application is an Ubuntu application that is part of a bigger effort called BulletProofX, which makes sure that you will never be left without a graphical environment. If it so happens to crash, no longer will you be presented with a blue screen with unreadable text, instead, you will be presented with the Screens and Graphics window allowing you to reconfigure your graphical settings. You can also run it normally, allowing you to easily configure multiple screens.
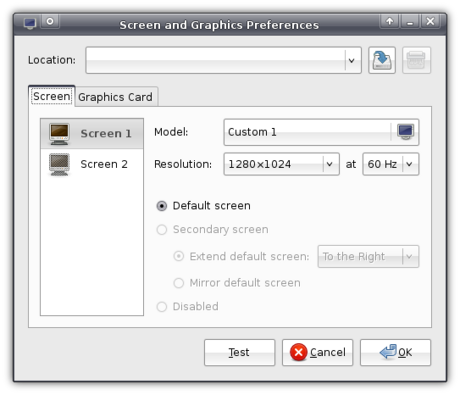
You can also use it to select a graphics card driver.

You can choose a driver by the name of the driver, or by the model of your monitor.
Also just as Ubuntu, Xubuntu Gutsy ships ntfs-3g. This does not really interest me, because I hardly know what ntfs is, but I still saw it was a Good Thingâ„¢ when I got my dad to boot Xubuntu Gutsy, who was delighted that he could delete files from his Windows partition.
Then Xubuntu inherits from Ubuntu the latest Linux kernel (core) that includes dynticks. Again, I’m not too sure what exactly it is, but I read that it makes sure Xubuntu uses less power and makes your computer produce less heat, which should especially appeal to laptop users.
Yet another thing inherited from Ubuntu of which I don’t know exactly what it does: AppArmor. According to Wikipedia, AppArmor is software that provides yet another layer of security allowing for even stricter definitions of what software is allowed to do.
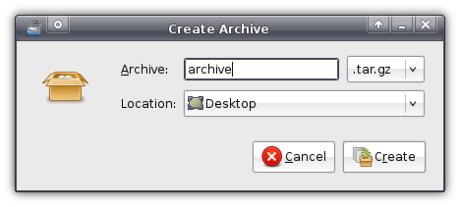
To replace Xarchiver, which was viewed by some as user-unfriendly, Gnome’s file-roller Archive Manager is now included. It allows you to easily create archives, in formats like .zip, .tar.gz or .tar.bz2.
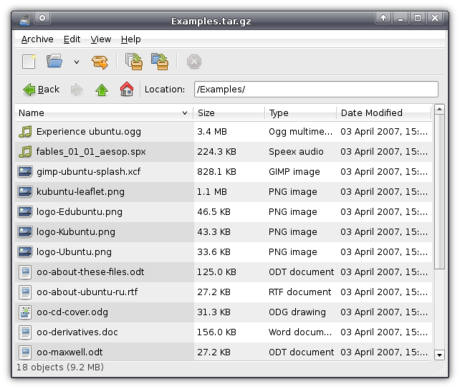
It also easily allows you to open compressed archives and view the contained files.
However, it is slower than Xarchiver, and since that one is still being actively developed I am of good hope that by the next release of Xubuntu, it will be considered user-friendly enough to make a comeback.
At first, Xubuntu Gutsy was to include a Places Plugin for the panel, just like Ubuntu has. Unfortunately, despite the usefulness of this panel plugin, it is considered too unstable for inclusion (as in: it crashes when trying to open a certain type of folder) so it won’t make it into the final release. Hopefully it will be stable enough by the time Hardy Heron, the version after Gutsy, is released. And of course, it still is available so you can add it to your panel yourself.
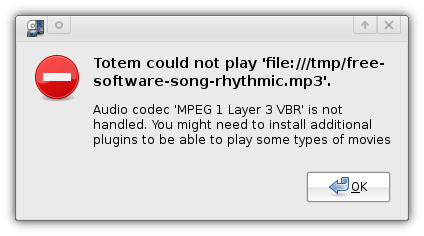
To replace the user-unfriendly Gxine, the Totem media player is now included by default. Unfortunately, it is named a bit odd in the Applications menu (Movie Player) because it will also play your audio files with ease.
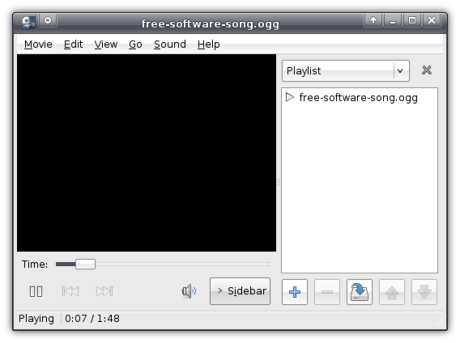
However, as opposed to Ubuntu (which uses Gstreamer), Xubuntu uses xine behind the scenes to play your files. This is mainly motivated by the fact that, by using xine, Totem has better support to play DVD’s (Gstreamer for one has problems displaying the menu). The downside of this, however, is that it does not include support for automatic lookup of suitable codecs to play your files. This means that it will produce and error when trying to play files restricted by legal issues, unless you have installed the suitable codecs yourself. If Gstreamer were used, it would ask you whether you’d want to install the required codecs and then automatically look them up and install them for you.
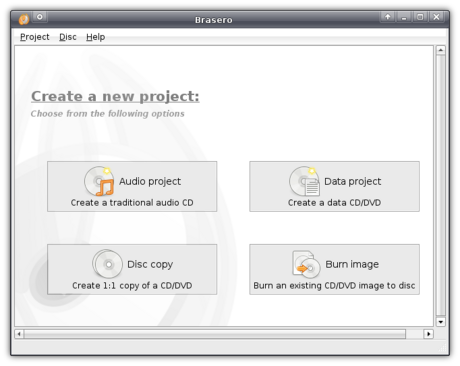
Brasero replaces the redundant Xfburn, which was no longer in development and missed a few important features. The choice of a burning application for Xubuntu was a difficult one. Most of the settled applications where either no longer in development, missed important features or were specifically made for KDE. Brasero, however, seems like a good choice.
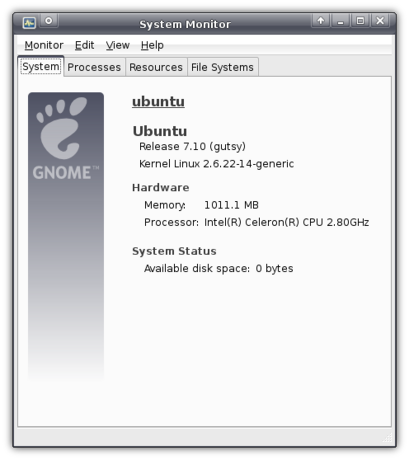
To replace and complement xfce4-taskmanager, Xubuntu now includes Gnome’s System Monitor. When you open it, you will be presented with the Resources tab open, displaying the current load on your system.
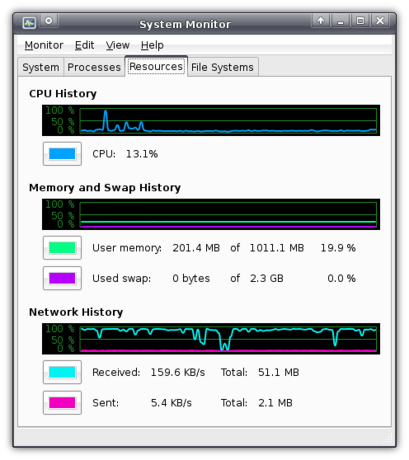
There is yet more though. Take the System tab for example. This tab is amazingly simple yet invaluable because it is the first graphical way of seeing which version of Xubuntu you are running (and yes, for now, if one has this application installed, you already know he’s running Gutsy). The System tab also displays your host name (the name of your computer), the version of the kernel, the amount of memory and type of processor, and the available disk space.
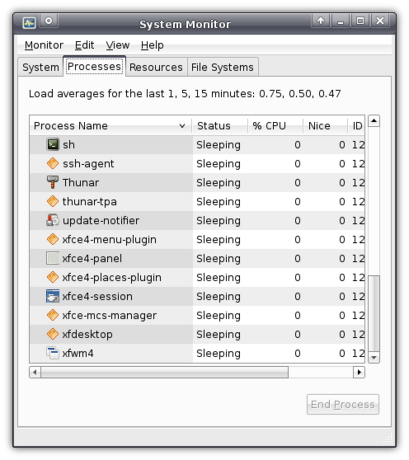
But lets not forget the Processes tab, which displays all running processes just like xfce4-taskmanager used to do. However, System Monitor displays a bit more information than xfce4-taskmanager (most importantly: it has icons next to the processes and an easy button to force an application to quit).
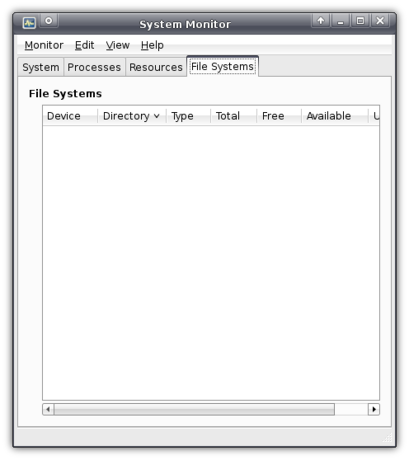
Finally, there is the File Systems tab, which I think is supposed to display information about your different partitions, but (probably because I was working from a LiveCD) it was empty for me.
Enabled by default in Xubuntu Gutsy is Update Notifier, which, surprisingly, notifies you when updates are available and allows you to easily install them.
Network Manager is an excellent application that makes it extremely easy to switch networks, which is very useful for laptop users often using different networks (e.g. one at work, another at home). It is represented by an icon in the system tray.
![]()
Clicking the icon pops up a list with available networks which take a single click to configure. Once you’ve configured your networks, it will be able to connect automatically next time it finds it. Unfortunately, I am on a computer that only has a wired connection (with which, by the way, it automatically connected), so I cannot show it to you.
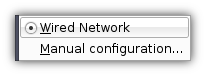
Clicking Manual Configuration opens Network Admin, which was already present in previous Xubuntu versions. You can still use it to configure your network without using Network Manager (yes, I find the names confusing too) by disabling roaming mode. Both methods support WPA encryption if your hardware supports it.
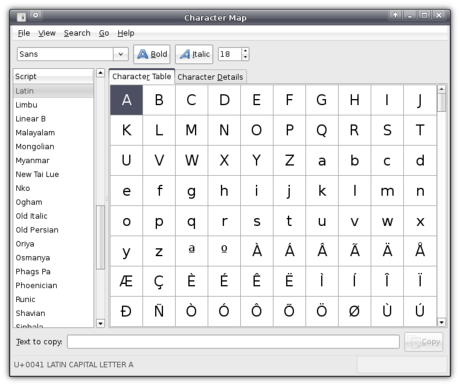
Gutsy also ships Character Map, a simple applications that makes it easy to look up special characters like é, á or even Æ, õ and ø!
Automatic printer configuration should automatically configure your printers when they are plugged in (you can’t get it easier than that!). Unfortunately, I do not have a printer so I could not try it out.
The next one in fact concerns not one, but seventeen (!) applications, but since it’d be a lot of work to discuss them all I’ll just mention them as one: Gnome’s Games! I can tell you that, at least for me, this is a very welcome addition. And the quality of these games is excellent!
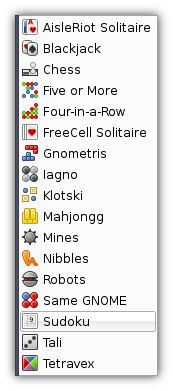
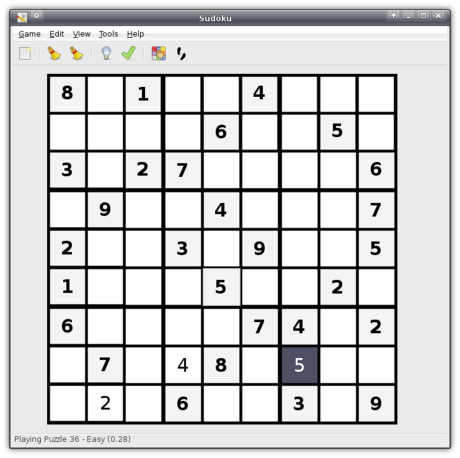
One of the included games is the hyped Sudoku puzzle game, which my mother greatly enjoys ![]()
The little things
Apart from all these big improvements, there are also a few subtle little changes that make the whole experience just that tiny bit more pleasant.
As every default application now has an icon in the menu, the key combination Ctrl+Alt+Esc couldn’t lag behind. This key combination allows you to click a window that might have crashed in order to force it to close. However, in previous versions, the cursor would change to an ugly black skull. Now, however, it is an elegant cross that fits in with the rest of the cursor theme.
In order to make Xubuntu even easier to get used to, and so as to prevent people from missing the documentation that was crafted with such care by all those superb volunteers, Xubuntu now by default has a help icon in the panel.
When saving or opening a file, you can now view Recently Used documents and Search for them.
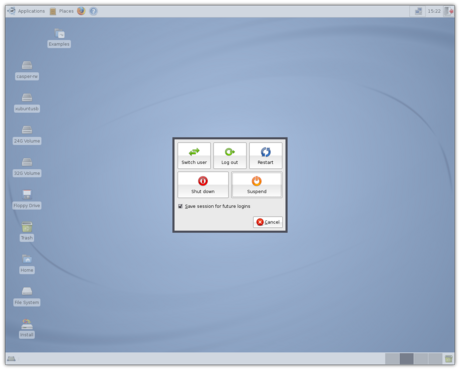
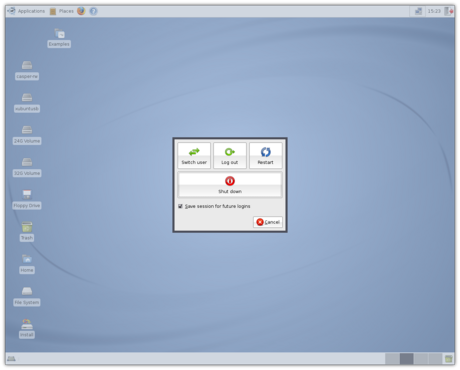
Instead of displaying six buttons in a row like done in previous versions of Xubuntu, the Logout dialog now displays the buttons in two rows.
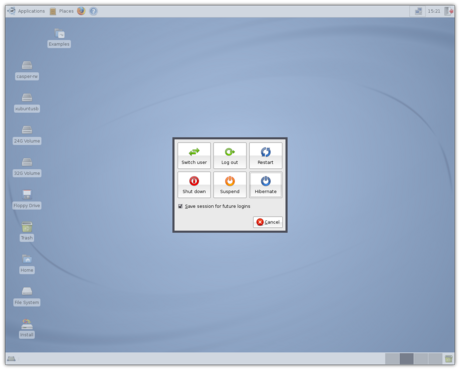
And you can still remove either or both the Suspend and Hibernate buttons which will neatly resize the buttons on that row to make it of equal width to the row above.
In previous versions, when shutting down, you would first see scary console text flying by for a bit until it switched to the easy-on-the-eyes logo with the progress bar. Well, that still happens, the scary text isn’t visible as long as it used to.
Speed
As you might have noticed from the screenshots, the machine I tested this on was quite a high-end machine. However, for those of you worried about the speed, Carrie offers reassurance in the comments:
I just installed Xubuntu 7.10 over the weekend on a PII 400 Mhz, 384 MB RAM test computer I have. I love the new look default theme on it. I was highly impressed with everything I saw as I clicked around in the menus and different settings. I enabled the effects as well and they worked beautifully.
One thing I noticed right away with the 2.6.22-14 kernel is everything is much more responsive than before. A very happy surprise. Including booting up. Instead of a two minute start up time under Feisty, it takes about a minute and a half.
Conclusion
That was a long, long read ![]()
I think this may well be considered the most important release since 6.06 “Dapper Drake”, which was Xubuntu’s first official release. Just as Ubuntu’s, Xubuntu’s goal has always been to be a user-friendly distribution, and it took a giant leap forwards and is even more so with this release. It will also be a good base to build on for the next Long Term Support version, 8.04 “Hardy Heron”, slated for release in April 2008.
Have you also tried Gutsy, and did you find it as awesome as I did (or perhaps you found it to be the worst release ever), or have I missed anything? Do not hesitate to use the comment form below!


Easy remote access with Thunar
Update: This is deprecated in favor of gvfs.Networking support is a hot topic in Thunar, and the most probable answer to a user will be one of the many FUSE tools. For Samba you can use fusesmb. For fish protocol and the like you can use sshfs. The benefit of a FUSE tool is that your remote data is accessible as it were on your file system. This results in the fact that all your applications can access the data, and not only the applications that implement a special API. There is never a need for high privilege, so every user can mount remote data from machines where they already have access. To unmount a fuse file system use the command “
fusermount -u /mount/point”.Fusesmb
Here is a little usage example for fusesmb to show how easy it works.% fusesmb sambaAnd if the listed networks are empty or outdated run the fusesmb.cache command:
% ls samba
WORKGROUP MASSONNET
% ls samba/MASSONNET
M8T
% ls samba/MASSONNET/M8T
share music movies cdrom
% fusesmb.cache samba
Sshfs(.sh)
As a prerequisite use an authentication with keys — there are tons of HOWTOs for that and I just picked up that one — otherwise you will be prompted for your password and this is a no-go for a Thunar custom action, unless you set up ssh-askpass…Sshfs works as simple as “
sshfs user@host: /mount/point” to mount the home directory from user on host. I arranged me a tricky Shell script to ease the mount even more. The script takes the hostname — the SSH server — and no further arguments. The hostname is also used as mount point, so you can basically have one directory with several sub-directories, each named after your remote hosts. If the mount point doesn't exist it is created on the fly.% sshfs.sh /sshfs/m8t
% sshfs.sh /sshfs/someuser@funkyhost
% sshfs.sh myhost.mine.nu
Thunar's Custom Actions
Thanks to the custom actions in Thunar, you can implement a lot of features on your own. I use the sshfs wrapper script to mount remote hosts. See how easy it is to set the next custom action up:
The custom action simply calls “
sshfs.sh %n” with the name of the directory. To unmount, you would create a custom action with the command “fusermount -u %f”.