Thunar patches, claws and everything
Now that there is xfce4 in fl:2-devel, I'll go to add some patches to thunar that didn't make it into 0.9. We need a mailclient too, so i will cook claws-mail, because it's a nice gtk+ client (for me, evolution or thunderbird, just don't feel right as default for Xfce Edition).Later i have to start hacking on group-desktop-platform, to check what we need. I think it will turn out as a slightly modified Gnome Edition just with Xfce instead of Gnome and will step by step change things where needed/wanted. After all it's Xfce not Gnome.
Xubuntu + Compiz = Pretty pretty Xubuntu
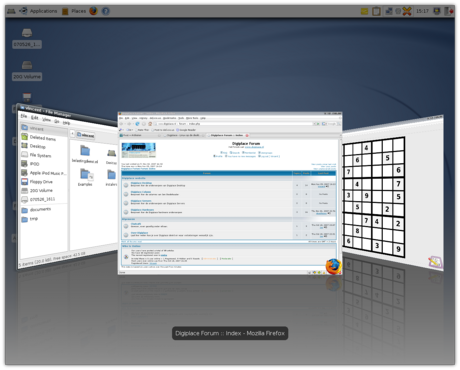
With the release of Xubuntu 7.10 “Gutsy Gibbon”, Xubuntu looks better than ever. However, it can look better still, with the breathtaking effects provided by Compiz. How would you like all your windows zooming out into little thumbnails to give you an overview a la Mac OS X’s Exposé? Or what about flipping through your windows Cover Flow-style (or Flip 3D-style, for that matter)? And then you haven’t even experienced the joy of your windows casting shadows on your desktop, or wobbling like jelly as you drag them!
And that’s just the tip of the proverbial iceberg as there are many more features for you to discover - after you’ve installed it using this guide :).
Note to users of 8.04: flotoonie and Ivotron report that this guide also works for Xubuntu 8.04 “Hardy Heron”.
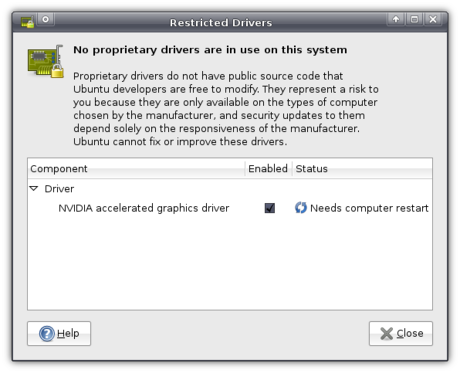
Preliminary note: your graphics card should support it. Most cards from Nvidia and ATI are supposed to work, as well as some cards from Intel. Most likely you will need to enable the proprietary, non-open source drivers using the Restricted Drivers Manager in Applications->System->Restricted Drivers Manager.
You can check whether you system can run Compiz using Compiz Check.
Before we start, I should also note that Compiz has not made a stable (i.e. 1.0) release, and undoubtly you will experience bugs yourself. This could include the occasional crash, your window borders disappearing (you can get them back by pressing Alt+F2 and entering “emerald” or, if that doesn’t work, “xfwm4″), windows being black in their entirety, or even being thrown out of your graphical environment completely. Be aware of the risks, and don’t blame me if it breaks ![]() .
.
A bit of history would be appropriate, so here goes. You can skip this paragraph if you already know what Compiz and Compiz Fusion are and just want to install them.
Developed within Novell (they bring you SUSE Linux) they released Compiz, a window manager with gorgeous effects to demonstrate their new XGL software which allowed better use of hardware and made these effects possible. Compiz became an independent project and kept adding astonishing new effects. As Red Hat (who bring you Red Hat Linux) developed AIGLX as an alternative to XGL, Compiz didn’t even need XGL anymore. A community formed around Compiz that made lots of useful and not-so-useful (but pretty) additions. One particular group of enhancements were not accepted into the main project and, being open source, a spin-off named Beryl that did include the enhancements was started. Beryl became very popular - perhaps even more popular than Compiz itself. However, both projects were dissatisfied with the duplicate work and found that they could settle their previous arguments. In a re-merge, most of Beryl’s plugins were made to work on Compiz under the name of Compiz Fusion. So now we have Compiz (or Compiz-core), the base system, with Compiz Fusion, which provides many additional, perhaps more experimental, plugins.
We will install Compiz as well as Compiz Fusion from the official software sources which will no longer pull along half of Gnome as it did in the previous version of Xubuntu.
A word of thanks goes out to Forlong who wrote a guide titled “How to install Compiz Fusion on Ubuntu Feisty - tutorial for advanced and/or KDE as well as Xfce users” - about the only guide that explains how to install Compiz on Xubuntu (up until now, that is ![]() ). Whereas his tutorial
). Whereas his tutorial focus[es] mostly on terminal commands
I’ll explain it like I usually do - the graphical way, with loads of screenshots. Do use his excellent tutorial if you prefer using terminal commands. Be sure to note, though, that his tutorial is for version 7.04, so you’ll have to replace “feisty” with “gutsy”.
Let’s start, shall we?
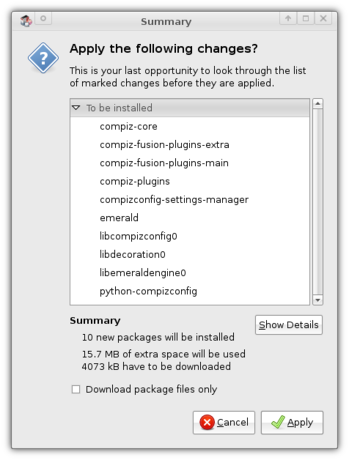
Note: If you rather copy and paste a command into a terminal window, use this: sudo apt-get install compiz-core compiz-plugins compiz-fusion-plugins-main compiz-fusion-plugins-extra emerald compizconfig-settings-manager
Fire up Applications->System->Synaptic Package Manager to install the required packages. First of all, we need compiz-core. This is just pure Compiz as opposed to the compiz package which pulls along half of Gnome. Then, of course, we need the plugins that take care of all the bling - don’t worry, you can select which plugins you want to activate ![]() . We need the packages
. We need the packages compiz-plugins, compiz-fusion-plugins-main and compiz-fusion-plugins-extra. Furthermore, you might like the application to draw the window borders, Emerald, instead of Xubuntu’s default xfwm4 (if you’re unsure, you’ll probably want it). If so, select the package emerald. Last but not least, we need an application to configure Compiz to be usable, so select compizconfig-settings-manager too.
Having selected them all, you can click Apply to start the installation.
Setting it up
Before you can run your newly installed Compiz, you need to configure it a bit. In order to do so, open Applications->Settings->Advanced Desktop Effects Settings.
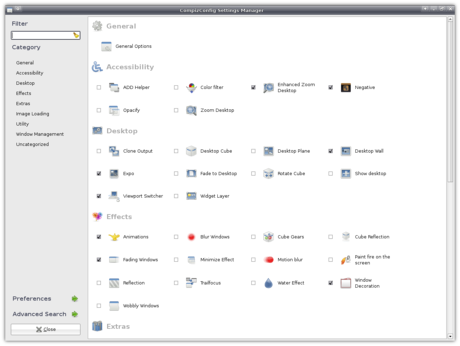
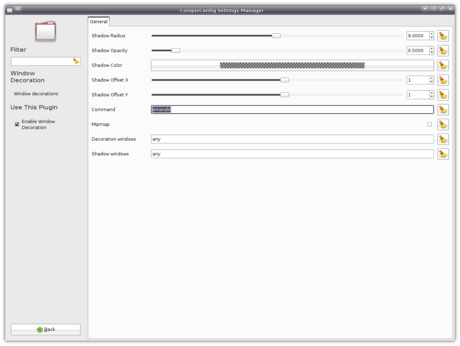
Beneath the “Effects” heading, click Window Decoration. In the Command input field, enter the window decorator you prefer (emerald if you installed that, xfwm4 if not).
Well, that’s about it - let’s try running it!
Running Compiz
Only one way to find out whether everything works as expected - run it! In order to do so, press Alt+F2, enter compiz --replace, then click Run. If everything works as it should, you should now see shadows around your windows!


Make it default
Now I’ll just assume that it ran successfully and that you want to have Compiz run by default every time you login. I’ll cover two ways to do that.
The easy-but-inefficient way
Using the first way Compiz will replace your default window manager every time you login. This means that, when you log in, first xfwm4 is ran which will then be replaced by Compiz, so even though xfwm4 is started, it will then be closed again without being used.
For this method, you open Applications->Settings->Autostarted applications.
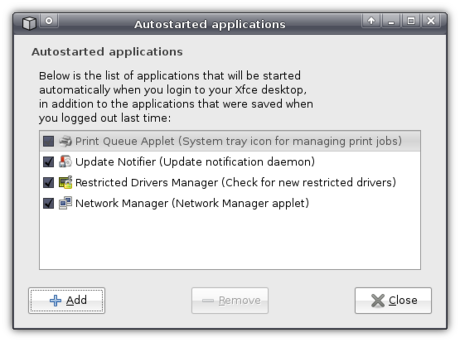
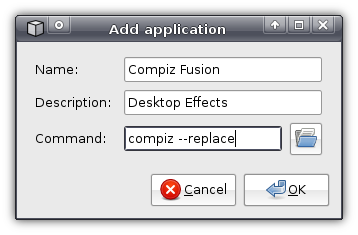
There, you click Add to create an entry with the following values:
- Name:
- Compiz Fusion
- Description:
- Desktop Effects
- Command:
compiz --replace
Well, actually, only the last entry really matters ![]()
Click OK and you’re done! The next time you login, Compiz will be started automatically.
The more-difficult-but-better way
So… You prefer the scary stuff? Well, it’s not that difficult, actually. You just press Alt+F2 and enter
gksudo "mousepad /etc/xdg/xfce4-session/xfce4-session.rc"
Basically, that opens the file xfce4-session.rc with root rights with the text editor mousepad.
In this file, all you have to do is replace:
Client0_Command=xfwm4
…with:
Client0_Command=compiz
(Thank Ubuntuforums user sisco311 for this one)
Do note that this makes Compiz default for all users, as opposed to the previous method which made it default just for you.
Take it easy
CompizConfig allows you to tweak a lot of the settings, which might be a bit overwhelming. Therefore you might feel the need for some sane defaults. Luckily, CompizConfig, in the Preferences menu, allows you to import and export profiles.
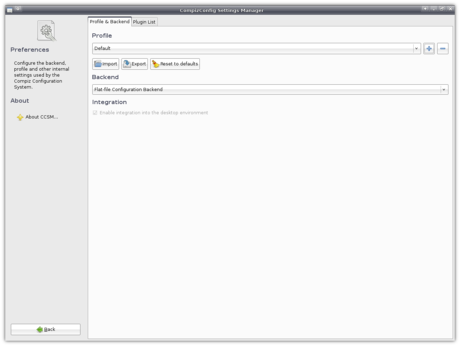
As you can guess, I’ve exported mine, so go and download it and Import it!
Troubleshooting
It might just be that it does not work for you - please say so using the comment form below, then I can share the solution with the world:
- If you experience problems that you cannot solve using any of the methods above, you can revert back to Xfwm4. Of course, how to revert depends on the method you used. If you used the easy-but-inefficient way you can simply uncheck the checkbox before Compiz Fusion in
Applications->Settings->Autostarted Applications. If you used the more-difficult-but-better way you have to open that configuration file again (gksudo "mousepad /etc/xdg/xfce4-session/xfce4-session.rc") and replaceClient0_Command=compiz…with:
Client0_Command=xfwm4Note that this will not uninstall Compiz - it will merely disable it.
- If nothing happens after you have followed all the steps, it might be that you need XGL for it to work (Xubuntu by default includes AIGLX). You can simply install it using Synaptic - look for the package
xserver-xgl. - Ivotron reports what’s happening when you do not have window borders and how to solve it:
For those not having window decorations after following all the steps try first by removing the contents of the .cache/sessions/ folder as mentioned by Rob Hodge.
Then, on Settings->Settings Manager->Sessions and Startup, check that ‘Automatically save session on logout’ is disabled. Also, check that if you have the ‘Prompt on Logout’ option is enabled, when you actually log out, the checkbox that appears below the ShutDown, Restart, etc.. buttons isn’t checked.
What happens is the following. If you like (as I did) to save your session so that the next time that you log in all the programs you had running appear again, this will also include the autostarted (from the xfce4-session.rc file) compiz. Then, when you log out and log in again, the XFCE session manager will try to run compiz twice (one from the xfce4-session and another from the last session), causing (at least that’s what happens to me) that the emerald window decorator never gets started (or something alike like killed by the –replace flag).
So, the conclusion. Follow all the steps, stop saving sessions and use the autostarted applications configuration instead.
- If Compiz doesn’t work and you have an Nvidia graphics card, then you may need to make sure it is configured correctly. You can do so by pressing Alt+F2, typing
sudo nvidia-xconfig --add-argb-glx-visuals -d 24and pressing “Run”. With thanks to Ransom’s comment. - If you are left with just one desktop, you have to set the “Horizontal Virtual Size” in
General Options->Desktop Sizein the Cube settings. - Rob Hodge also had a problem:
i couldn’t get it to work as the default setup.. it kept loading xfcewm instead of compiz or loading no window mqanager at all. so iâ€d sometimes be left with no decoration as the major noticable effect. this was even after changing the xfce4-session.rc file.
He solved it by opening a terminal window (
Applications->Accessories->Terminal) and typing:
rm ~/.cache/sessions/*
WARNING: After pressingEnter, this command will remove your saved session (i.e. the state saved if you checked “Save session” on logging out previously). If you don’t know what I’m talking about then it’s probably no problem. - Crewe did not have window decorations. Though the steps he took are quite complicated, and he needed to install Metacity, GNOME’s window manager, he solved his problem. I am not sure whether this will work for you, and it is probably safest to assume it won’t. For those still interested:
A run down of what I did was first
installed all the apps I needed:
sudo apt-get install compiz-core compiz-plugins compiz-fusion-plugins-main compiz-fusion-plugins-extra emerald compizconfig-settings-managerI removed nvidia-glx / nvidia-glx-new as they directly conflicted with my nvidia drivers, and put me into “Low Graphics Mode†and caused all sorts of issues with the xserver.
sudo apt-get remove nvidia-glx –purge
sudo apt-get remove nvidia-glx-new –purgerespectively.
installed metacity:
sudo apt-get install metacityrestarted the computer (this is key)
then made sure I had a fully functioning xorg.conf that I created from mish-mashing the generated
configs from the following commands:sudo nvidia-xconfig
sudo dpkg-reconfigure -phigh xserver-xorg
nvidia-settingsand everything was working graphically, and I was using the restricted drivers, with nothing was crashing.
Then I added these entries to my xorg.conf
Section “Extensionsâ€
Option “Composite†“Enableâ€
EndSectionand
Option “AddARGBVisuals†“Trueâ€to the Device section
I then reinstalled the nvidia drivers
sudo nvidia-installer -f-fforces the install, when the install asks you if you want it to generate and xorg for you SAY NO! (You just spent a lot of time creating a working one)then restarted the computer again.
it’s still a bit finicky as I had to run it twice to get it to work, and afterwards I can’t switch back to xfwm4 but it’s I small price to pay.
UPDATE: I’ve since uninstalled metacity, and everything seems to be working great
Of course, you can always read the comments for this post to read everybody’s problems/solutions or general tips.
That’s all folks!
Just because Xubuntu is speedy doesn’t mean it should not look pretty. With the release of 7.10, finally Compiz is no longer exclusively Ubuntu’s. Enjoy the looks!


A little delay
Looks like I won't have time to work on Xfce Edition before Saturday. But if all goes well Xfce 4.4.2 will be available for fl:2-devel then and we will get rid of this nasty bug in xfwm4. The recipes are already there...Xfce 4.4.2 released
Yesterday Xfce 4.4.2 was released. Now I have to find some time after work to get it into Foresight.Hopefully I can cook it tomorrow night. One step closer to the Xfce Edition.
All green
I'm working a bit on Xfce Edition of Foresight Linux (isn't it green), so I decided, that there might be news worthy to write about but don't expect something interesting here, I'm pretty bad at blogging.Installing Xubuntu
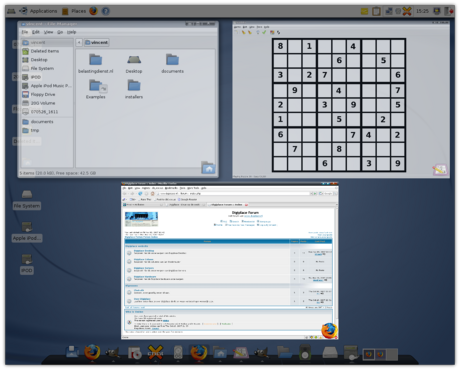
When I installed Xubuntu 7.10 “Gutsy Gibbon“, I could not resist the urge to create a walkthrough for installing Xubuntu. It took me a while to write it up, but here it is. (Note: I have also written a review of Xubuntu 7.10)
Since Xubuntu uses the same installer as Ubuntu and Edubuntu, Ubiquity, this guide also applies to them, and Kubuntu’s installer is basically the same, so it also gives you an overview of what Kubuntu’s installation looks like. Also, the installer has not changed since the previous version, 7.04 “Feisty Fawn“, so it applies to that version too.
To start the installation, you just click the Install icon on the desktop once it is booted. However, I wanted to configure my internet connection first, because that way I would immediately be able to install language packs and whatnot. Note, though, that you can also complete the installation without internet connection.
In order to configure my wireless connection, I click the NetworkManager icon in the top right-hand side. It then pops up a list of detected wireless networks and has an entry listing my wired card.
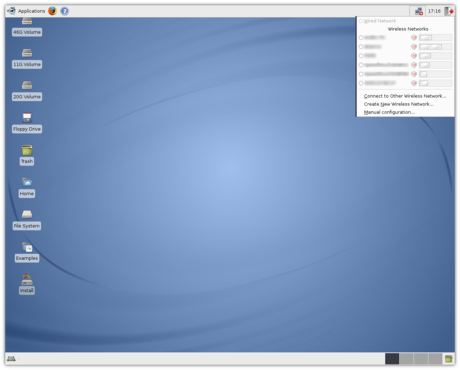
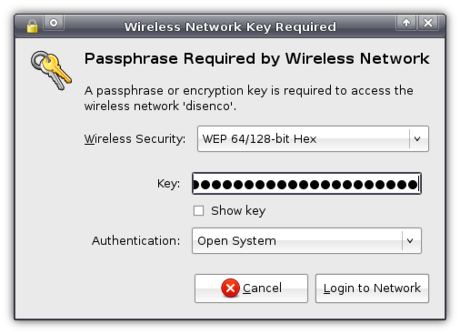
Simply clicking the network I want to connect with, it prompts me for the passphrase. I can then click Login to Network and I am connected! It couldn’t be easier ![]()
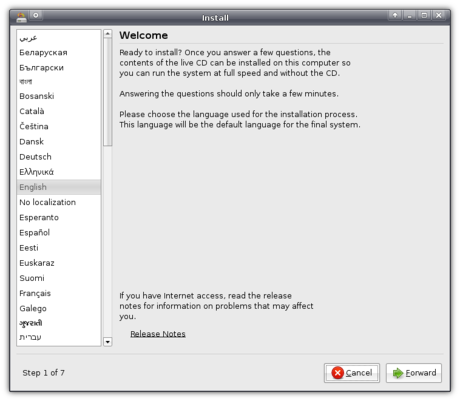
Now that my network connection is all set, I can start Ubiquity (the installation application, remember?). The first screen allows you to select a language and links to Ubuntu’s release notes.
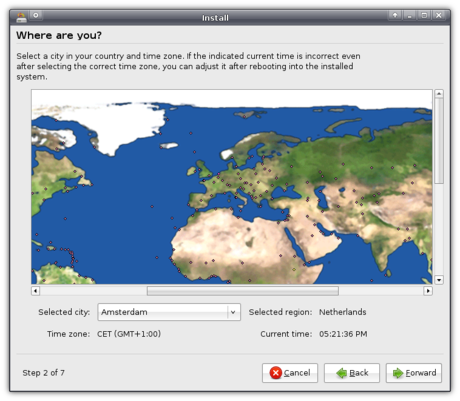
Clicking Forward brings us in the timezone selection screen, where we are presented with a map of the world.
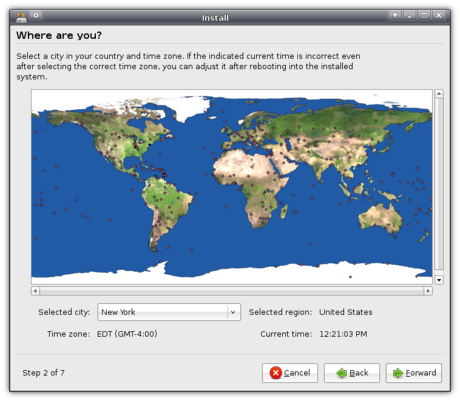
Clicking the area on the map where you live zooms in the map making it easy to select your location.
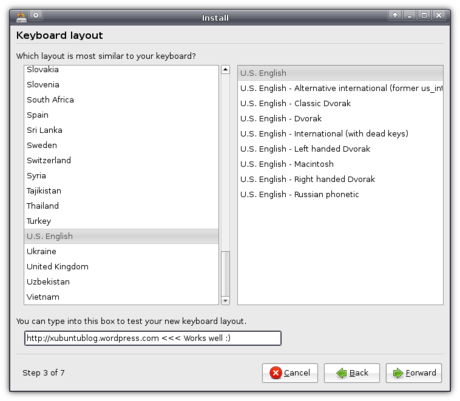
Clicking Forward again presents us with a screen to select your keyboard layout. It includes many options, including many Dvorak ones (note to self: get to learn to type using Dvorak). An input field allows you to test the selected layout.
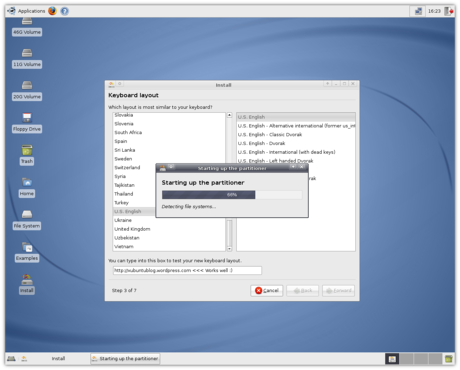
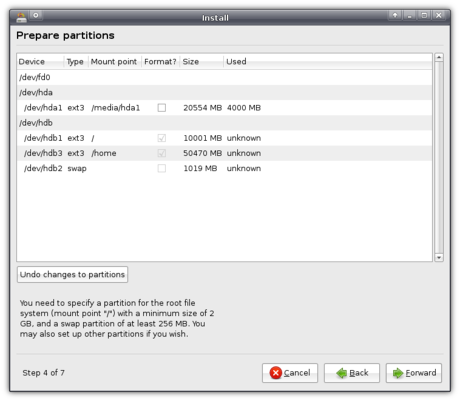
Yet again clicking Forward, a dialog box pops up telling the partitioner is being started.
When it has finished loading, you are presented with three partitioning options:
- Guided, resizing your main hard drive using the freed up space to install Xubuntu.
- Guided - use entire disk to wipe a whole hard drive and install Xubuntu on it.
- Manual
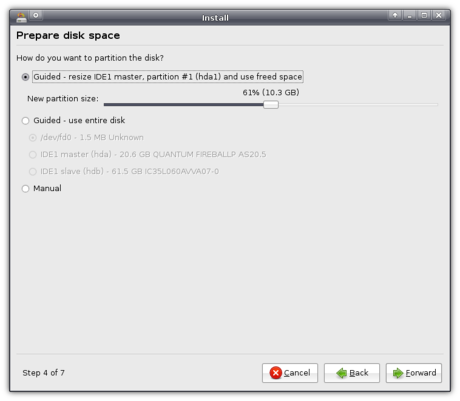
I opted for Manual.
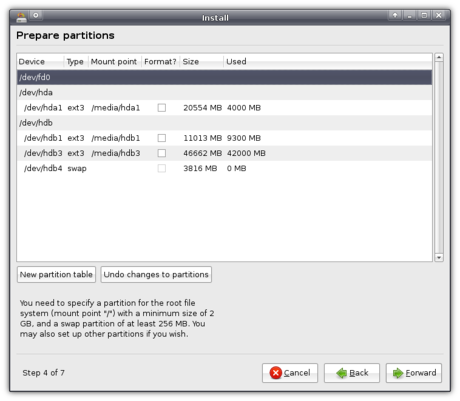
The reason for me to select Manual was because I wanted a separate partition for /home, which allows me to keep all documents and settings for all user accounts were I to reinstall Xubuntu (i.e. when a new version is released). Adding the required root (/) and swap partition I ended up with a total of three partitions.
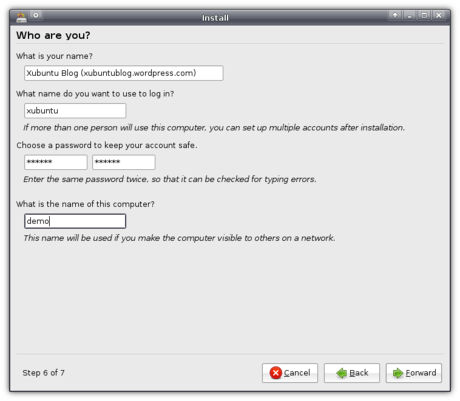
Then we need to provide Xubuntu with some user information for the first user account.
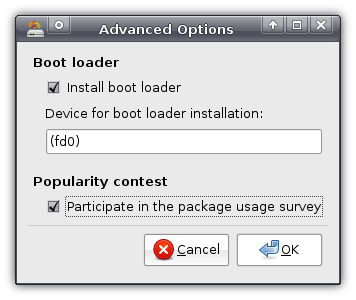
And finally, just before the actual installation will start, you are presented with an overview of everything you have selected so you can check it.
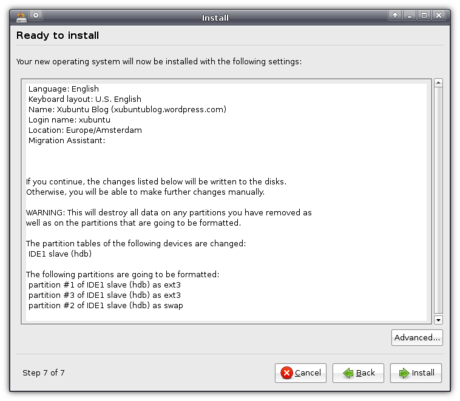
However, before you commence the installation, be sure to click the Advanced button in the bottom right-hand side. It allows you to set the location of the boot loader if you wish to, and enables you to opt in for the “Package usage survey”. If you check the checkbox, Xubuntu will send anonymous application usage data to a central Ubuntu server, so they can generate statistics about which applications are most popular. Not only does this enable the developers to improve the distribution in general, it also influences e.g. the ratings of applications you see in Add/Remove…
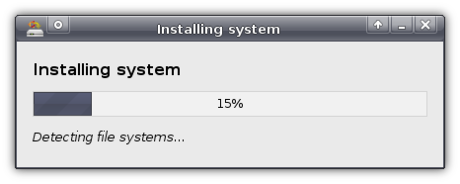
It will then start the installation, which will take a while.
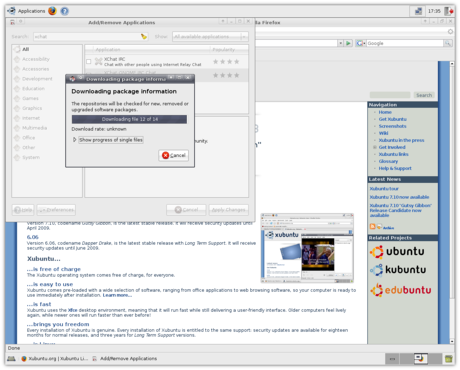
Meanwhile, and this is an awesome feature, you can continue to use the system! You can browse the web using Firefox, heck, you can even install new applications for use during that session, all while the installation is progressing!
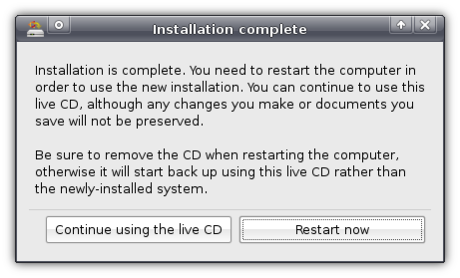
After a while you will be notified that the installation has finished, and that you should restart the computer to use it.
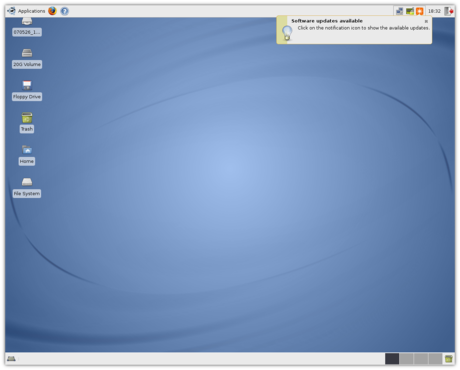
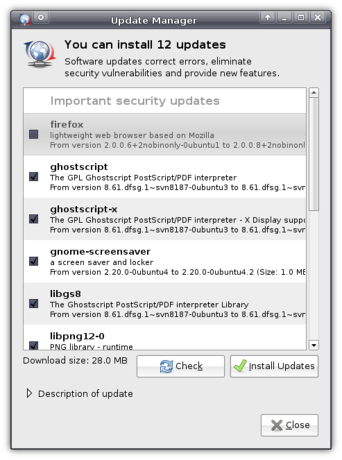
When you have restarted, with your internet connection configured, you will mostly be notified that updates are available.
I was also notified that I had the option to enable a restricted driver. This driver is not open source, but as I would like to try out Compiz Fusion (more on that in a later post) I wanted to install the driver.
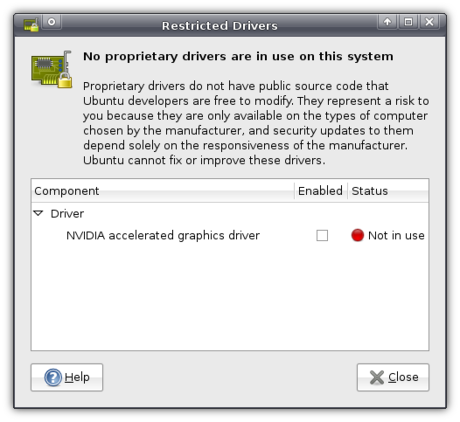
Enabling the driver was very easy - just check the box and it will start the installation.
Once the installation completed, I was notified that I had to restart.
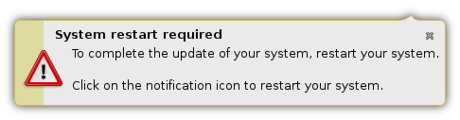
Clicking the notification gave me the option of deferring the restart to a later time, or to restart immediately.
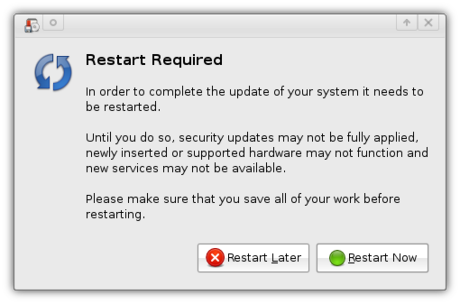
That restart was the last restart I had to do since ![]()
All in all, Xubuntu’s installation process is a breeze. The partitioning part might be a bit scary (but hey, we’ve got Wubi if it’s too scary) but overall, it’s very easy and even comfortable. Being able to use the system while it is installing is a feature that blows away every other operating system I’m aware of, apart from other Linux distributions ![]()


Marihela update
Today I was working around Marihela, and I already had the idea of what to do. It is incredibly awe-some to work with an external display. There was enough space for a well sized xzoom, gimp, and full sized terminal (shade/unshade ^_~). You can check out on my gallery.
If you wonder what the GTK+ theme is, it is Aurora-Midnight.
Download Marihela.tar.bz2.
Update: The most recent version of Marihela can be snapshotted from my gitweb interface.
More LGPLv2.1/GPLv3 Crap
Someone calling himself "textshell" left a comment on my previous post that made me think about a few things.
If I release something under "GPL version 2 ONLY" (which is what I usually do), I expect it to stay released under that license.
If I release something under "LGPL version 2.1 ONLY," I expect it to either stay as the LGPL or be converted to GPL version 2 -- and ONLY GPL version 2.
I'm not sure I understand textshell's rationale here: "If you used LGPL before you seem to have been ok with the code used in commercial software, so why do you want to make sure it’s not usable in GPLv3 software?" Those are two very different things. LGPL allows proprietary software vendors to link with my code, which -- for any software I release under the LGPL -- I have no problem with. But allowing people to re-release my code under a license I do not fully understand and do not fully agree with (GPLv3) is not ok.
"Compatibility with other licenses" is not the main criterion by which I choose a license for my code. I choose a license that has terms with which I feel comfortable. At this time, I do not feel comfortable with the GPLv3. That may change, but for now, that's just how it is.
The merits of the various additions in the GPLv3 can be (and have been) debated quite a bit, but I think it's safe to say that the GPLv3 as a license is more restrictive than the GPLv2. Say I release something under LGPLv2.1, and in my license header, I say "version 2.1 of the license ONLY." This means that -- weirdly enough -- no one can relicense my code as LGPLv3 (or even use it with LGPLv3 code as-is), BUT, they can "convert" (aka relicense) the code to GPLv3, and, presumably, they're allowed to add the "or, at your option, any later version" clause. Now, the GPL is of course more restrictive than the LGPL. The GPLv3 is more restrictive than the GPLv2. I'm not currently comfortable with the restrictions imposed by the GPLv3, and I have no idea if I'll be comfortable with GPLv4, GPLv5, etc., but the LGPLv2.1 unfortunately appears to have terms that directly contradict my wishes that the code stay as LGPLv2.1/GPLv2.
We don't know what the GPLv4 will look like. Say through some unlikely twist of fate, Microsoft buys the FSF (currently the only organisation "allowed" to release new versions of the LGPL/GPL). Microsoft then goes and releases GPLv4, which adds a clause that basically says "if you receive GPLv4 code, you may relicense it under a proprietary software license." In this instance, anyone who has released code under "GPLv2 or later" or "GPLv3 or later" has granted MS (or any other company) the right to make a proprietary fork of their code. It's this thinking that leads me to release all my code under a license that says "GPL, version 2 ONLY."
Now, do I really expect MS to somehow acquire the FSF and release an "evil" GPLv4? No, I don't. But the fact remains that I have no idea what will happen in the future. Trusting an organisation full of people I don't know to produce future versions of a license that I'm happy with doesn't sound like a good idea. Indeed, they've already released a new version of my license of choice that I don't fully agree with, so why should I trust them to do so in the future?
If and when I feel comfortable with the GPLv3, I'll probably re-release all my software under a "GPLv3 ONLY" license. But that's it for the LGPL -- I have no intention of releasing any new code using the LGPL, with the exception of stuff contributed to LGPL libraries (like libxfce4util and libxfcegui4) that are mainly "LGPLv2.1 or later" and are 'owned' by other people.
If you don’t like GPLv3…
... then it's best not to use LGPLv2.1 either. According to this footnote of the GPLv3 draft FAQ:
Every version of the LGPL gives you permission to relicense the code under the corresponding version, or any later version, of the GPL.
This is a bit disturbing to me. According to this, if I release software under a license which states "LGPL version 2.1 ONLY," someone can go and re-release this software as GPLv3. And indeed, section 3 of the LGPLv2.1 states:
You may opt to apply the terms of the ordinary GNU General Public License instead of this License to a given copy of the Library. [...] (If a newer version than version 2 of the ordinary GNU General Public License has appeared, then you can specify that version instead if you wish.)
That's ridiculous. The license explicitly ignores whether you release under "LGPL version 2.1 or any later version" or "LGPL version 2.1 ONLY." Amusingly, it looks like, under these terms, if you release LGPL-2.1-only, someone can't go and re-release as LGPLv3, even though they can re-release as GPLv3. To illustrate the retardedness, here's my interpretation:
| Release under: | Can be converted to: |
|---|---|
| GPLv2 or later | GPLv3 or later; GPLv3 only |
| GPLv2 only | nothing else |
| LGPLv2.1 or later | LGPLv3 or later; LGPLv3 only; GPLv2 or later; GPLv2 only; GPLv3 or later; GPLv3 only |
| LGPLv2.1 only | GPLv2 or later; GPLv2 only; GPLv3 or later; GPLv3 only |
Is this correct? It seems so horribly wrong.
I need to go through my stuff and make sure I'm not using LGPL for anything, though I suppose I'll have to leave libxfce4util and libxfcegui4 alone since most of the parts I don't own are LGPLv2.1-or-later, so it's probably not worth the effort. And, I'd better be more careful about understanding the licenses I use.
HW Project
Sometime, when I have energy and time, I will build one of these for my HTPC.